


Free Range Approach: Ch. (T.) melleri
By Suzanne Boom & Jim Nieberding
Citation:
Boom, S. & J. Nieberding (2008). Free Range Approach: Ch. (T.) melleri. Chameleons! Online E-Zine, February 2008. (http://www.chameleonnews.com/08FebBoomNieberding.html)
One of the things that first drew us to keeping Ch. melleri included Allison Banks’ article, in this E-zine, as well as other reports about successfully keeping this large species in small groups and in free range environments. What appealed to us most was the concept of creating a habitat where our chameleons would be so content they wouldn’t even want to leave.
We like to have our chameleon habitats as self-sufficient as possible, minimizing the daily chores involved, both for our benefit and that of our chameleons. With our free range design, all we have to do on a daily basis is feed the chameleons and pick up leaves and droppings; the heating, lighting, misting and drainage systems are completely automated. It took about 2 ½ years of engineering and trial and error, but we have now managed to build such a habitat for our four adult Ch. melleri.

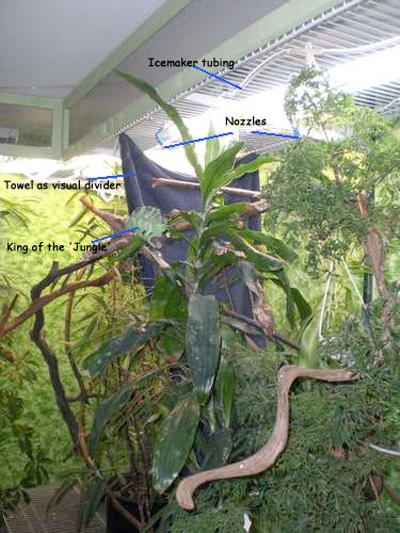
Free range for four melleri; 17’ long, 2 ½’ deep and 5’ tall.
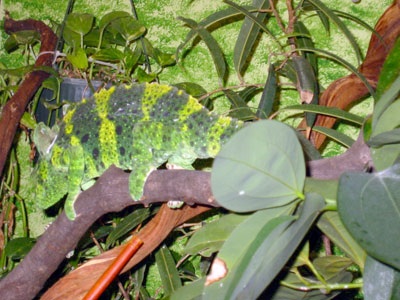
In those 2 ½ years of keeping Ch. melleri, I have become convinced of the advantages of free range habitats for these chameleons. After observing my own animals and talking with other keepers I have formed a hypothesis that Ch. melleri prefer to have an unobstructed view of their surroundings. It may be that this is especially the case for males. Both males I currently keep have endured a period of relentless rostral rubbing (apologies for the alliteration) against the screens of their cages. One is a CB male in my care since July 2005, when he was 5 months old. He started rubbing his rostrum as a sub adult while housed singly in a 2’x2’x4’ screen cage. This behavior abruptly disappeared when we moved him into a free range (this was free range 1.0; less than half the size of the one discussed in this article). Since then (1 ½ years ago, at the time of writing) this animal hasn’t shown any signs of relentless rostral rubbing (again, sorry) or other neurotic behavior and he rarely wanders from the free range. We interpret this as a more content animal- overall stress levels are lower. The other male is a long term captive (LTC) adult that I adopted in April 07. This animal had been in good hands for the last 2 years and was always kept in large (5’x5’x5’ or more) screen cages with several females (2 of which he mated with). Despite excellent care and conditions, he went through a period of rostral abrasion, aggravating a .previously sustained rostral injury. After moving to a new environment this behavior immediately ceased. Although we cannot fully credit the free range with this change in behavior, Dume has been an outstanding tenant in the free range.

LTC male melleri with serious rostral abrasion
I’m not trying to say that Ch. melleri can’t be housed successfully in cages. After all, many have done and are doing so. But I do think that these large chameleons are more susceptible to ‘cage stress’ and maybe have a stronger need to wander or at least survey their territory.
I have found that both in cage and free range environments, these animals spend a great deal of time in spots with an unobstructed view of their surroundings. In addition, I’ve noticed seemingly increased confidence and “tameness” with free ranged Ch. melleri around their keepers and they can be approached more easily. I think this owes to the fact that the animals can see our approach better than through the screen of a cage and, therefore, are not as easily startled. Both the CB and the WC Ch. melleri will readily eat out of my hand, and allow visual examinations without fuss.
Of course this doesn’t mean that they don’t have a need to hide. In fact I think it’s important to not just give the chameleons the opportunity to hide from us keepers, but perhaps more importantly, from each other. I realized this while observing the CB male attempting to court a female in the old free range. The female was so uninterested that she retaliated by chasing the male with even more determination than he chased her! I noticed however, if I distracted the chaser (male or female), allowing the other get to the opposite end of the free range (and essentially out of sight,) the interaction immediately ceased. Achieving this goal in a free range requires extremely dense foliage or some sort of opaque visual barriers. In lieu of a more esthetically pleasing solution I hung three old bath towels about 3 feet apart in the new free range, effectively dividing it into four sections, one for each animal. Each section has a misting nozzle, a feeding cup, a heat lamp and UV lighting. This ensures that the animals don’t have to move from section to section to get their basic needs. The barriers don’t block the entire cross section and the chameleons move freely from section to section and on average in the course of a week everyone gets everywhere at least once. Though I haven’t been able to test the effectiveness of the visual barriers on a courting pair, I have seen territorial displays by the large LTC male dissolve almost instantly after the CB male disappeared behind a towel.
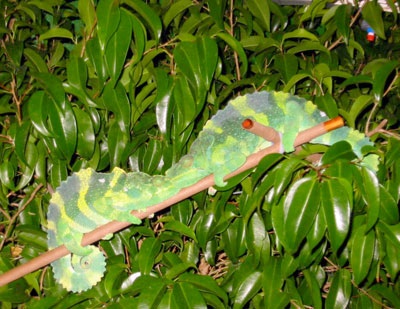
territorial display with lobes raised
There is another interesting behavior that developed in the free range: the melleri will climb down out of the trees and gather around me whenever I pull out a cricket bin. The cricket and roach bins are stored under the free range and as soon as I sit down on the floor and pull out one of the bins, the chameleons will start making their way towards me. Animals’ gathering at a feeding trough isn’t surprising, but how peacefully this situation plays out is quite fascinating: none of the chameleons display stress colors or raise their occipital lobes. All the adults gather around the bin and either shoot crickets directly from the bin or wait for me to hand feed them. I don’t do this every day, but one or twice a week it’s a very fun experience and it allows me to interact with the animals on their terms. The two CB melleri usually will not leave until I put the bin away and get up, but the WCs sometimes just leave when they’ve had enough to eat.
I have a feeling that the WC melleri are picking up cues from their captive bred counterparts. The CB melleri have always been very social (for lack of a better word) and inquisitive. The WC pair has become increasingly socialized since they have been housed in the free range. At first the WCs would stay up in the trees and I would have to hold crickets up as high as I could for them to reach down and shoot them. Over time they built an impressive level of trust. I think the free range encourages this increased socialized behavior and therefore lowers the ‘background stress’ that I fear every captive wild animal experiences.
When free ranging chameleons it is important to make sure the room is chameleon-proof and the door to that room is always kept closed. I think any chameleon would leave a free range at some point and it’s important to make sure that the chameleon can’t get itself into trouble when that happens. The few times that we had a chameleon leave its habitat (free range or cage) and not return before dark it would find some hard-to-get-to spot, usually either high up or behind something. Even an adult melleri in a closed off room can be hard to find in such a situation. For that reason I wouldn’t free range any chameleons under 6” SVL (snout to vent length) or animals that haven’t yet been acclimated.
The ‘But-I-Thought-You-Weren’t-Supposed-To Keep-Chameleons-Together’ Disclaimer
Chameleo melleri does seem to be an exception to this rule and the five successful matings that I know of all occurred in situation where a pair or small group of Meller’s chameleons had been kept together for a year or more. Regardless of the evidence supporting grouping Ch. melleri, I feel this should never be taken lightly. Keeping chameleons in groups always has some risk of adding extra stress.
Based on conversations with other melleri keepers I think it is likely that frequent interaction with both males and females is a natural part of a Meller’s chameleon’s life, however we know too little about how and how often these animals interact in the wild to know how much interaction occurs.
All four of my adult Ch. melleri have been in captivity for more than 2 years and I know their personalities. I think this puts me in a better position to recognize problems. I wouldn’t house unfamiliar or un-acclimated Ch. melleri in pairs or groups. Even if these animals are somewhat gregarious in the wild, I doubt they have to be kept in groups to thrive or that keeping them together is always the best solution. You should take the time to get to know the animals, and to let the animals get to know each other, before deciding if a group situation is appropriate.
cohabiting melleri will often sleep close together, though not always this close
Now about how we built the free range
When designing our free range we had list of attributes that we felt were most important to include, beyond the basic requirements of a chameleon enclosure:
- The free range floor needs to be far enough off the ground to allow for a drainage system
- There needs to be a barrier between the chameleons and the lights
- Misting and drainage need to be automated
- The chameleons have to be able to sit above eye level
- We have to be able to reach every corner of the free range without having to disassemble everything
- There should be a basking and misting spot for every chameleon
- The chameleons need to be able to get out of sight of each other
Actual Design and construction of the free range.
Part 1 - Required Skills
This is an advanced project. You will need the following skills to build your own Chameleon Free Range:
- Basic Carpentry.
- Basic Electrical- (wiring your own receptacles and switches.)
- Intermediate Plumbing (you'll be tapping off a nearby bathroom sink supply line for the misting system.)
- Intermediate "Handyman Skills:" You'll be modifying and installing a lot of wire shelving, routing plumbing through your attic, installing gutters inside a room and even drilling a hole through your house. At times, you'll have to modify off-the-shelf products and bend them to your will. Make sure you're up to the challenge before you get in over your head and have to hire a handyman and watch their eyes roll as you explain what you're trying to do!
Please note that we are writing this article long after we finished the Free Range, but we’ll do my best to describe what we did and how we did it.
Step 2 Prepare the room!
Before you do anything, decide what room you want to use for your FR. Building a Free Range is not an easily reversible decision, although we intentionally avoided drastic measures for some degree of reversibility. If needed, we could convert our free range back into a serviceable bedroom in a couple weekends.
We chose our northeast-facing bedroom, right next to the master bedroom, but across the hall from the bathroom. This bedroom has the most continuous wall space, so we could make a HUGE and spacious free range. It receives the most sun and a lot of natural daylight. This is advantageous, because we have found that our chameleons seem to enjoy having a line of sight to a sunny outside. All that sunlight makes it the most naturally warm room in the house, and while it seems like it'd be an advantage for a room full of reptiles to be hot, that's not always the case. ''Melleri'' hail from the mountains, where it's cooler. We will have to compensate for that with thermostats to shut off all heating devices when the mercury climbs, and we replaced the bedroom door with a simple screen door to keep air flowing and the cat out.
One problem is that this bedroom is across the hall from the bathroom. This will make the plumbing a little more challenging but still perfectly possible. More on that later.
Once we've chosen a room, we need to plan out the free range. Ours is L-shaped running the length of two walls. We planned for the drainage to exit the room at the corner of the house, which matched up nicely with the room's closet. Doing this, we will be able to hide the drainage pipe next to the downspout on the outside of the house.
Now we can really start! The first thing to do is prep the room- protecting the walls from the daily mistings. We painted the walls with a high-quality exterior grade paint. While painting, you have a great opportunity to go nuts with decorator techniques and make the walls match the jungle motif you're going for, but the most important thing is to protect the walls. These walls will be subjected to daily rain and round-the-clock high humidity, so choose a quality paint that will stand up to the abuse. If money is no barrier, then by all means tile the walls like a bathroom. If aesthetics are no barrier, you could also install exterior siding on the walls. Bleah.
I do NOT recommend protecting the walls with flexible plastic, like painter's cloth or pond liner or solid plastics. We tried this and discovered there's no easy way to fasten it to the wall without breaking the seal. (e.g. staples or nails) Eventually, moisture will get behind the plastic and the mold that will grow will cause you no end of trouble.
We went with exterior grade sea foam green paint base, and later during the construction we added a sponge-dabbed darker forest green for a nice jungle-like texture.
We started construction on our free range the day after settling on our new house. The new house was empty and we had plenty of space to work in.
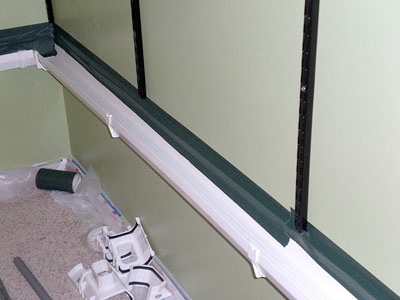
In these photos, the wall standards and gutters are already up. We did it backwards. You should do it forwards. Let's go install the gutters in the next step.
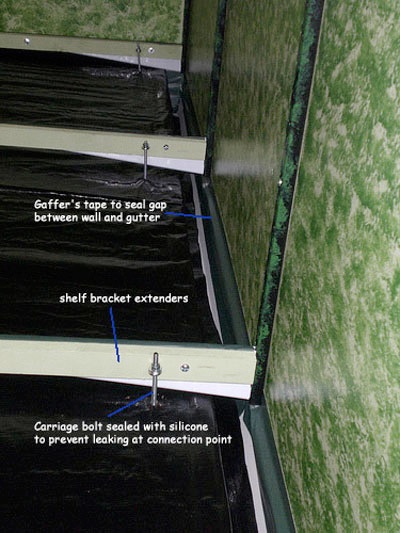
Step 3 - First thing's first: the gutters.
Gutters? yep. You're going to want gutters. It works like this: The misting system comes on, it rains on your chameleons. The water falls down to the floor of the free range, where it is diverted into gutters and carried to one end of the room by good old Newtonian gravity. The gutters lead to some plumbing and we're going to plumb the water path right through an outside wall and out of your house...and outside of our house the chameleon sewage waters and feeds our vegetable garden. (and it works- we get tomatoes the size of grapefruit!).
Start with the gutters- they are the lowest part of the whole project. For ease of installation and peace of mind, we used modular vinyl gutter materials commonly available at the Big Box home improvement stores. The vinyl gutter parts snap together very solidly and have built-in rubber gaskets to make a leak proof system. Metal gutters are a pain to cut and seal properly.
All the guttering is mounted right on the wall with standard hardware just as one would attach it to the outside of a house and then sealed on with gaffing tape. I avoided caulking to make tearing down the free range easier.
What you'll need:
TOOLS:
A stud finder.
A hammer & nails
A drill/screw gun & screws
A level
Optional: a ping pong ball.
MATERIALS: (you’re going to need to tailor this list for your own design)
Enough Vinyl gutter to run the length of your free range.
two gutter connectors
two gutter end caps.
One gutter downspout adapter.
If you're going around a corner like we did, you'll need a corner adapter.
one 4" 90 deg PVC pipe.
one 4" to 1.5" pipe adapter.
The gutters need to slope slightly to ensure drainage. Start at the end you want to water to drain to. This is where you'll install the downspout adapter. This end of the gutter should be just a hair higher than your electrical outlets. The other end of the gutter should be just high enough so that a ping pong ball will roll unhindered from one end to the other.
Step 4 - Install the Standards for the wire shelving.
Wire shelving systems are also commonly called "closet organizers." There are several different brands sold at several different stores. It all works the same way: Heavy steel uprights called standards are bolted to the wall, and shelf brackets of various lengths fit and lock into the slots on the standards. They are very strong and highly adaptable, which is probably why they're so popular. People use these systems to organize their closets and storage rooms, some organize their garages and workshops with them, and others make simple bookshelves with them. A few weirdoes turn them into reptile habitats. If you're one of those weirdoes, make sure you get the heavy-duty style with two rows of slots on the standards.
The wall standards are the central framework of the free range, and they need to be mounted to studs. Your FR is going to support hundreds of pounds of plants, equipment and your precious chameleons, do you really want to trust all that to drywall? (Especially drywall that will be sprayed with water every day) (You did protect your drywall by painting in step two, right? RIGHT?)
Use a stud finder or clever measuring (studs are usually 16" apart in American homes) to locate the studs to which you'll screw the standards. We positioned our standards 32" apart, and it's working just fine.
As for the length of the standards, in our house, 6' standards worked perfectly, and could be mounted almost flush with the ceiling.
TIP: The standards need to be perfectly level. Don't trust your ceiling to be perfectly level. Use a carpenter's level to check each one. This is especially critical when going around a corner.
Make sure your free range begins with a standard and ends with a standard. This way, the ends of the shelving units will be supported.
Note that the finishing paint isn't done in this step. We originally weren't going to do a sponge print finish, but after the standards and the guttering, we changed our mind.
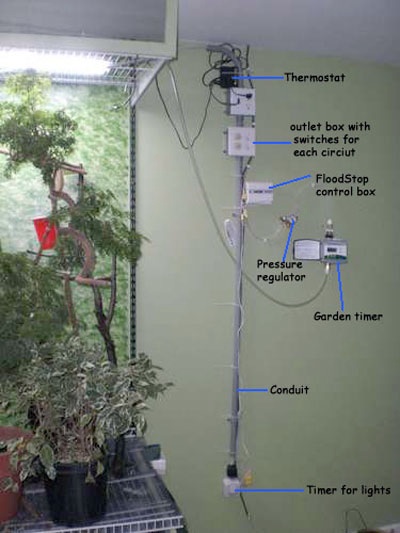
Step 5 - Wiring receptacles for the lights and thermostat.
OK, professional electricians might cringe at this step, but this is how I did it. I wanted this system to be removable, so I surface mounted all the components, otherwise I would have built it all into the walls and ceiling.
I wanted two receptacles in the ceiling over each section of the free range, and I wanted them on separate circuits: one receptacle for the UV fluorescent lights and the other for the heating spotlights. I really didn't want to cut into the walls and ceiling to "professionally" install this strange wiring, so I surface-mounted it and ran the whole thing to a plug. The whole thing is just a big complicated extension cord.
I added a light switch for each circuit and the heat lamp circuit has incorporated an off-the-shelf reptile appliance thermostat. This device normally regulates some sort of electric heater in a closed reptile cage, but it will work in the free range just fine by killing all the heat lamps if the temperature rises too high. ALL lights are on a timer, but the heat lamps are ALSO on a thermostat. That way day and night temps are controlled. Chameleons need a dip in the temperature during the night, so this works out nice.
TIP: You want a Thermostat, not a Rheostat. They look very similar, but their function is different. On a lighting fixture, and rheostat is just a dimmer. You want a thermostat so if the room temperature soars too high in the summer, it'll turn off the heat lamps.
Materials for our main free range: (again your list may differ)
- three, 2 receptacle boxes
- four 15-amp outlets.
- two switches
- plenty of 15 amp electric cabling.
- conduit! don't forget to get 90 degree elbows if you're going around a corner like we did.
- conduit hangers and nails or screws
- a plug.
- a reptile heating appliance controlling thermostat.
Optional: 1 Ground Fault Interrupt Outlet. (GFCI)
A GFCI is a REALLY good idea in this case...In our room the electric system had to be very close to the water system, and we all know how well water and electricity get along together. A GFCI, which are now mandatory in American bathrooms, is the special outlet that protects us when the toaster falls into the bathtub with us- it breaks the connection in a split second.
Since we're on the topic of danger, I don't have space here to teach readers about basic electrician skills, so I'll say this:
If you're not comfortable working with electricity, please find someone who is. This step isn't terribly difficult, but when you're working with electricity a simple mistake can be deadly, dangerous, terribly damaging or at least minimally inconvenient. I thought I knew what I was doing and I still popped the breaker a few times and even blew up the outlet in the wall, and used the opportunity to replace it with a GFCI.
Step 6 - Extend the Floor Shelf brackets.
Shelf depth for Standard wire shelving systems seems to top out at two feet, and even those were hard to find- most of them are 18." Well, even two feet wasn't enough free range "floor space" for our needs, so we extended the 24" shelf brackets to 32" with wooden 1x2s. This still works out nicely because the actual shelves come in 12" and 16" depth. We can make the floor from two 16" deep shelved arranged edge to edge.
Here's how I extended the 24" brackets to 32": Wooden reinforcement.
I used a drill press to drill 2 holes through the 1x2 and the shelf bracket at the same time so they'd match up. Carriage bolts attached the two together. (The square part of the carriage bolt sinks into the wood)
Water resistance precautions: before assembling each extension bracket, paint the wood with the same exterior-grade paint you used on the walls. (you DID paint the walls, right? RIGHT?) I also covered the top of the bracket with tape. In the past, these brackets proved to be prone to rust on the inside, so I sealed them off with the same tape I sealed the gutters to the wall with. I almost filled them with expansion foam, but I already had the tape.
Step 7 - Drainage Diverter
The challenge: divert the falling water into the gutter.
The idea: a sloped waterproof surface just under the free range floor. High in the front, low in the back.
This would be a LOT easier with plastic, or better yet: corrugated roofing material. Thing is, that stuff is expensive! We calculated it would take about $200 to do our whole free range with corrugated roofing stuff. We looked a lot of options, but kept returning to a cheaper alternative: cover hardboard with a waterproof tarp and suspend it from the FR floor shelf brackets with carriage bolts and eyelets. That solution came to about $20. Much better.
You know how long your free range is, so you know how long the material needs to be, but do you know how wide? Invite Pythagoras over and revive some high school trig. The length of the bracket and the height of the bracket from the gutter are two legs of right triangle, and we need to know the hypotenuse, and the hypotenuse of this triangle is how wide you need to tell the guy at the lumberyard to cut your hardboard for you.
...Or you could just span a tape measure from the end of one bracket to about 1/3 of the way over the lip of the gutter.
Tip: Take your bracket to gutter height measurements at the left most bracket- that gutter is sloped, remember?
Or, if you're following our model exactly, the magic number is 33 inches.

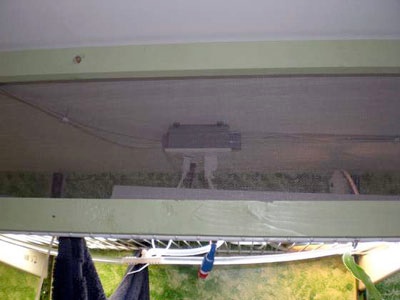
Step 8 - The Lighting Cage
In our house, the chameleons don't have a cage, but the lights do. When keeping reptiles of any sort, you should put some sort of mechanism to keep the animals from burning themselves on lights. In the free range we cage the lights in, and the animals out.
Wire shelf comes in two varieties- narrow mesh and wide mesh. The chief difference (besides price) is the distance between the wires. For the lighting cage, you want the narrow mesh- it's just close enough to be a barrier to the chameleons. They can climb through the other variety.
Once the shelves are up, you want to construct a couple simple doors to prevent access through the front and sides. These are made from inexpensive pine lumber and some screen. Make a wooden rectangle the size of your lighting cage and attach it to the wire shelf with a couple screw eyelets that you pull open with some pliers.
Materials:
24" brackets
2x 12" deep close-mesh wire shelves. If you can't cut them, have the store do it. Measure twice, cut once. Those suckers are expensive!
Several 1.5" x 1" x 8' lumber.
Fiberglass screen- buy a roll that's 24'x36" - It'll come in handy when we add the plants.
Screws
Saw & Miter Box
Screwgun
scissors
staple gun
Lay the narrow-meshed wire shelving on 24" brackets up high in the free range. You lay the lights ight there on the shelf, and close in the space with the wooden screen door you made, and use opened eyelets hooked onto the edge of the wire shelf as hinges. Adult Meller's chameleons can't squeeze through the space in the wire shelves, and no amount of climbing and mischief will lead them to sit on a hot lamp.
To construct the front doors of the lighting cage, build ppropriately dimensioned rectangles from the lumber you bought. Paint it and screen it. We attached ours to the shelving units with two screw-in eyelets opened up to form hooks. Screw one in at each bottom corner of the door securely attaching it, but so it also operates as a hinge so you can open the door for light maintenance. We measured our rectangle 1/16†larger than needed so friction holds it against the ceiling when closed.
The lights we use are regular 60 watt bulbs for heat and ZooMed Reptisun 10.0 for UV-B
Step 9 - Plumb the water out of your house.
Ok, you've got the gutters up, and you've built the water diverters. Now we'll install plumbing to catch the water from the gutters and send it outside.
At this point, we're going to start drilling holes through walls, and eventually a hole outside your house.
We've got to be clever here:
The pipe has to be large enough so the water can leave all winter long (without freezing and backing up...
...and...
Well, you don't want SUCH a large hole that it's hard to keep the area warm in the winter. (At least here in Maryland)
In our first free range, I used 3/8" icemaker line to take the water outside. It froze solid, leading to water backups in the house and a big mess. This time I'm using 1" PVC pipe. It will go through a U trap so cold air can't get in.
The picture below shoes how nicely a 4" PVC elbow fits over a gutter downspout adapter. Two adapters are required to reduce the 4" to 1" and then a $.70 J-hook pipe mount holds it securely in place.
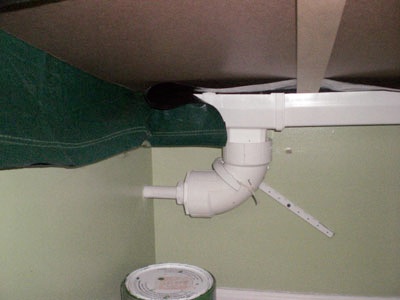
The left wall goes into the closet, which is where we'll divert the wastewater outside.
Words can't really express how unnerving it is to drill a 1" hole all the way outside your house. I measured this ten times and after what was probably the longest ten minutes of my life, I had a gaping hole just large enough to install a 1" PVC pipe and leave a gap to weatherseal the hell out of it. I think half of that wall is now filled with Great Stuff. (expandable wall insulation)
My house is wooden, so I really over-caulked the exterior breach for maximum protection.
This summer, I've got plans for a serious garden to grow in our side yard. The results from our last free range runoff irrigation were amazing.
Step 10 - Misting system: overview
OK gang. Here we go, this section describes the basic anatomy of our Chameleon misting system.
This is an extremely Ying/Yang duality, in that the theory is simple as can be, yet execution can be extremely complicated.
This is because it's water. Water is one of the critical elements of all life, it boasts a unique set of chemical properties to do what it does, yet for all it's importance, it is extremely annoying when it gets somewhere you don't want it. Water damages most of the things that houses are typically made of, and here we are building a system to make it rain inside your house.
Your chameleons need water, which is why you're building all of this. Mold also thrives on water, which is why you're trying to keep it from seeping into your carpet and walls. It's a careful balance to strike.
The mechanics of a reptile misting system are straightforward: there are essentially three parts:
1: A source of water
2: A valve to control the water flow.
3: Misting nozzles. These spray the water on your pets. This is important- you want to rain on your reptile, not drench it like a garden hose! A good misting nozzle will take water at house pressure (40-60 psi) and practically atomize it. This will help distribute the water as well as increase the humidity of the habitat. They're harder to find, but worth it.
****'
IN REALITY:
1: Source of water. It can be a hand-carried pump sprayer, a reservoir with an electric pump or the plumbing in your house, but that water's gotta come from somewhere.
Tapping off your house plumbing is the best and most reliable source of water, assuming you pay your water bill on time. You'll never have to fill it up, and there are no pumps to run dry. There are no tanks to clean or store or take up space.
But then again.....
* City water has a bunch of chemicals in it- you need to do your own homework to make sure your water is SAFE for your reptiles. Some reptiles are sensitive to chlorinated and flouridated water and "hard" water will eventually calcify (read: clog) your misting nozzles, leading to annoying maintenance. On the other hand "soft" water may have too much sodium for your chameleons.
* You'd better be sharp on your plumbing skills before screwing around with something like this. You're risking flooding your house. We've been there and done that, and we can tell you: it sucks. On two occasions with our first experimental design, we had so much water leak on the bedroom floor, through the floor and into our 1st floor light fixture, we could have raised goldfish in it. And that's just the water that the light fixture RETAINED. It sucked.
2: Garden timers. Garden timers are real handy for watering your garden as well as your reptiles...until you try to adapt garden hose thread to something useable indoors. Take a good hard look at the photo- the industry didn't make it exactly easy to adapt to the stuff your house uses. Garden hose fittings aren't as leak-safe as indoor plumbing items...they were meant to be used outside!
* Here's the breakdown of adapters I used: coming out of the top: A male/male Garden Hose adapter connects to a Garden Hose/1/2" NPTF adapter which is screwed to a 1/2" NPTF/press-fit 3/8" icemaker line adapter. The 3/8" icemaker line goes over the attic and into a bathroom faucet supply line. On the bottom side of the garden timer, it's the same, you can omit the male/male GH fitting. This is the SIMPLEST method I could figure it out.
* Garden timers are battery powered. We found the batteries last a very long time- over a year. Eventually they will die however, and there's a 50/50 chance that their last operation will close the valve.....or open it. Again, we've been there and done that. We've beefed up our drainage system so it can handle an all-day rain without backing up, but we don't dare go on vacation without changing the batteries.
3: Misting nozzles and tubing. The best place to get them is greenhouse supply places. There's a nifty place in Maryland called Ecologic Technologies but their turnaround time on orders is just about glacial. We like the "red nozzles", which spray is a nice wide 115 degree pattern and don't use too much water.
* Misting nozzles are a pain in the neck with hard water. Every six months or so you should count on pulling all the nozzles and soaking them in vinegar overnight. When a nozzle clogs, sometimes it will shoot a stream of water at a very odd angle- straight at a wall, out into the hall, or, gulp, right into the middle of your bedroom floor.
* Actually, those nozzles burn a lot of water- in our house we have 12 nozzles, and at 4 times 10 minutes every day, it's like having a teenager who showers 4x per day! We're on city water and the cost adds up. To compensate, I added a pressure regulator to the line with drops our house pressure to 21psi- which cut the free range water consumption by more than half, yet the nozzles still mist nicely.
* If you use chlorinated city water for your misting system, the nozzles and tubes will likely remain sanitary and low-maintenance. Much of our tubing runs right under the UV lights and we've never had a speck of algae or anything. If your city puts so much chlorine in the water that it smells like a swimming pool it may be best to not plumb your misting system directly off the water supply. If you use untreated water or a storage tank and an electric pump, you're going to want to "blow the lines" with highly chlorinated water every six months to kill bacterial buildup. This is REALLY important with chameleons, which are highly susceptible to infection of all kinds.
4: Yeah, I know I said there were only three concerns. In reality there's a Four.
Get a Floodstop device- it will cut off the water of there's a leak. After multiple nightmares with bad leaks, we laced our free range room with sensors all over the place. As soon as water hits the floor, the source is cut off until I can get in there and troubleshoot what went wrong.
* The floodstop is composed of three parts: a solenoid valve, a console, and a sensor. We installed the valve right at the sink supply line so the only unprotected point of failure is the supply line itself. The solenoid is powered by the console via a short wire.
* The console is installed in the chameleon room. It houses the brain of the floodstop as well as all the controls. It has outputs for home automation system such as X10, so theoretically your home computer could call or email you in the event of a leak.
* The sensors are simple resistive circuit boards that can be expanded (greatly! I've got 12 hooked up to one console!) by wiring them in series. In addition to all the sensors on the bedroom floor, I insisted on having a sensor in the sink cabinet as well. I had to be a little creative with the wiring. I already separated the console and the solenoid by nearly 20 feet of wiring, but now I had to send and return the sensor signals too. 6 conductor Thermostat wire proved perfect for this. Label the conductors appropriately: Power +, Power -, Send +, Send -, Return +, Return -. It doesn't matter what colors you use, of course. Just that you line them up right.
* The floodstop was the best $90 I spent on this project. The sensors can detect slight dampness in the carpet and immediately shut the valve. It takes a minute for the pressure in the whole system to decline, but serious damage will likely be avoided.
* Floodstops are available for most plumbing fittings in your home. They were designed for washing machines, icemakers, hot water heaters and sinks. We got the sink model- it screws right onto the supply line, and then a brass "T" screws onto it. This splits the water up to the sink and over to the free range and protects the whole thing.
Materials:
A Garden Timer
A Floodstop model that matches your plumbing supply and as many water sensors as you like.
A Brass tee to split the water under the sink.
An plastic compression sleeve for polyethylene tubing. The brass sleeves will fail eventually!
Enough 3/8" polyethylene "icemaker" tubing to get from your plumbing to your garden timer.
About the same length of 6 or 8 conductor thermostat wire.
A 20' roll of 3/8" PVC tubing.
As many misting nozzles as you want for your free range (1 for every 2-3' of free range will work.)
Make sure you get the all the necessary parts for the nozzles. You'll need the female fittings and the barb fittings
An array of adapters to get icemaker line into and out of the garden timer.
'''PROCEDURE'''
Run the ice maker line and thermostat wire first. We had to cross the attic to get from the chameleon room to the bathroom, but it wasn't an ordeal because our attic is spacious and has floorboards installed. If your attic doesn't have a floor, it's important to know that you can only stand on the rafters- the drywall won't support a petite girl carrying a bunch of helium balloons. BE CAREFUL. Find the location of the wall leading down to the bathroom cabinet, and drill a hole. Thread the ice maker and thermostat wire together.
From under the bathroom cabinet, I drilled a 1.5" holesaw straight through the back, taking care not to nick existing plumbing. It took a little trial, error, to get the line run down the wall and through the hole, but we got it threaded through and that was that. I connected the plumbing and wired up the solenoid (Power + & -) as well as the sensor (send and receive + & -).
Shut off the water to your house. Go get your wrench set, a bucket and a couple towels. It's go time. Lets do this thing.
'''WATER SUPPLY''': Bathroom Faucet Supply Line: Make sure you tap off the cold water. Under the sink of the bathroom turn the cold water off at the wall. Open the sink valve. Position the bucket and towels to catch the inevitable mess...and undo the compression fitting for the line up to the faucet. This is where you are installing the Floodstop solenoid, and if you bought the right one, it'll screw right on. Right after the floodstop, install your brass T. Reconnect the faucet supply line to one outlet of the T. The other outlet goes to your newly run ice maker line. '''USE THE PROPER COMPRESSION SLEEVE!''' This is the voice of experience speaking here. In the last free range, we used the wrong sleeve- the one for metal tubing. It'll hold for awhile....but at 1 year and 6 months, that sucker popped right out and flooded the house.
Meanwhile, back at the ranch....
'''VALVE TO CONTROL WATER FLOW''': Time to assemble all your adapters and timer in the chameleon room. Take your time...use teflon tape where you need it and work methodically. You don't want to break the timer, and you really really don't want this thing to leak. Cut your tubing at 90 deg. angles, and once everything's connected, use the tacks that Cable installers use for cable TV lines to fasten it to the wall. Be clever when fastening the timer to the wall.... we bent up a clothes hanger for a mount and you can't even see it in the picture.
Lastly...
'''MISTING NOZZLES:''' You know what? It sounds crazy, but I don't want you to install this permanently yet. Measure out how much tubing you'll need to get from the timer to the end of the free range, and then add five feet. Cut that length and drape it haphazardly across the lighting cage.....
...and add just one misting nozzle to the end. Use this to test your plumbing-fu, and make sure your drainage system is doing what it should. Troubleshoot your leaks and get the kinks unkinked. We can and will add more misters later when we're really happy with the location of all the plants....
Step 11 - Assembling the whole thing and plant some plants!
Alrighty gang! Are you still with me? This is the fun part- assembling the whole thing.
The ceiling of the free range is made from 2 pieces of close-meshed 12" wire shelf laying on the 24" brackets. Put the light fixtures up there and plug them in. We put fluorescents up front and spotlights more toward the back. Test the lighting system and close off the doors.
The floor of the free range is made from 2 pieces of regular meshed 16" wire shelf, arranged long edge to long edge. It's best if the "lip" of the shelves faces upwards. Cover the entire free range floor with window screen. You really don't want curious chameleons getting through the floor and into the drainage system.
At this point you've got the skeleton of your free range finished.
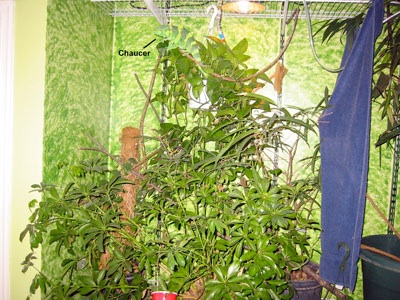
It's time to go plant shopping! Our free range is a little over 5' tall, so that's the max height of the plants we can buy. As you plan out the actual jungle, you'll want to mix large trees with shorter shrubs as well as nice vine-y hanging baskets. Big meaty-trunked trees placed every two feet or so will provide the "framework" of your rainforest, and mid-sized shrubs fill in the holes. Up in the "canopy" of your rainforest you can drape vines- some real, some artificial, that will serve as the pathways around the habitat.
The big plants:
Ficus alli. This is the narrow-leafed ficus tree, and unlike the problematic benjamina, loves to be rained on. We've killed 5 large and expensive benjaminas with our free range. We switched to alli and never looked back.
Canella (cinnamon tree) This plant is large, robust and has a great jungle look. It’s large branches provide great pathways for traveling chameleons.
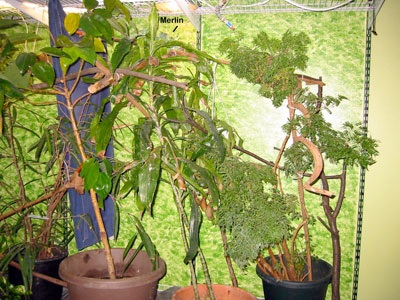
Polyscias sp. (ming aralia). This is an investment level plant- but it's well worth it. Small Mings (12" tall or so) can be had for $20-30 at the big box nurseries, but they absolutely flourish in our chameleon cages and the free range. A 5' tall ming aralia will easily set you back over 200 bucks; if you can afford that, go for it. Mings are really cool looking plants and the chameleons love their branchy builds. Alternatively, buy small ones for "ground cover" and they will grow. We've got one over 5' tall now and we potted it as a 12" sprout about three years ago.
Coverage plants:
Schefflera. Also called "umbrella plants" these guys are hit or miss in a free range. We've got a couple that are going well, but for each successful growth, we've killed one. Pot them in extremely well drained pots or their roots will rot out from under them. Some are bushy, some are treelike. Get a variety and build out your free range as you see fit.
Pothos. Let pothos grow across the floor of your jungle and it'll take over as much of your domestic rainforest as you allow it.
Use your imagination. Suzanne and I are cephalopod biologists, not botanists. If you've had success with other plants in your free range, tell us about it!
Canopy:
Pothos again- the runners pothos sends out will not adequately support your melleri, but if you drape the runners over the more robust chameleon highways I'm about to describe to you, it adds realistic cover for your arboreal dragons.
Nepenthes: Nepenthes are tropical pitcher plants- carnivorous vegetables! It's challenging to get specific identifications of nepenthes, but both lowland and highland pitchers seem to do well in the free range, but I can't get them to keep their pitchers. They grow and thrive, just pitcherless.
Highways, and other commuting options:
It’s best to create ‘chameleon highways’ throughout all levels of the free range; high and low, exposed and hidden. When housing more than one chameleon it’s important to provide them with multiple ways to get from A to B. Building highways will also save your plants from a lot of wear-and-tear!
Branches from your local forest- Select robust dried branches that haven't rotted. sterilize them as best you can- spraying them with rubbing alcohol and blasting them with steam cleaning tools has worked well for us.
Dowels covered with horse bandages (also known as ‘vet wrap’). Dowels are rods made of hardwood and widely available at many hardware stores and craft stores. Horse bandages are elastic wrappings that stick to themselves, and are generally available wherever horse supplies are sold. Horse nuts wrap horse legs with them, presumably for support. All I know is that horse bandages rock for wrapping dowels so they're more applicable for chameleons. Dowels are hard and smooth, and chameleons have trouble gripping them. Wrapping the dowels with brown or green colored horse bandages makes the dowels slightly more natural looking and far more useful for the chameleons. The same holds true for bamboo sticks.
Commercially available artificial vines. These plast-O-rubber vines with metal insides have become much more convincing in the last few years. They blend in nicely with the jungle motif, and you can bend them to your liking. Once zip-tied into place, the large ones can support adult melleri with no problem.
Commercially available real vines. Real vines, whether dried grape vines or harvested responsibly from the tropics, are fantastic additions to your free range. They are strong, rot resistant, and look great in the free range. Too bad they're so expensive. Some tropical rainforest vines are available, but please purchase responsibly. Destroying a real rainforest to build your own is not an irony to be proud of.
Don't use rope. We used 1" thick ropes a few times, and although they look great and function even better but they rot like crazy.
''Barriers.''
As we have mentioned before, we divided the free range into 4 sections by hanging towels from the lighting cage. It’s not a pretty solution, but it is effective. In time we plan to design something more natural looking.
And we’re done!
It's been a long road transforming a bare bedroom into a slice of jungle, but you're finally there. Once the plumbing, drainage, lighting and heating systems are operating satisfactorily and you've got the plants where you like them you can splice and zip-tie the misting nozzles in wherever you like. The end result is a beautiful indoor forest that both you and your chameleons can enjoy and that doesn’t require a lot of daily maintenance. It's time to move your chameleons in!
At the time of writing, the chameleons have had five months to get the hang of their habitat and so far it's a qualified success. Our chameleons show few signs of stress, are well hydrated and incredibly tame for a genus known for introversion. Personally, I think Meller's Chameleons are the most social of the chameleon species; each individual truly has a unique personality. Every single trip to the Chameleon room results in some sort of (and often humorous) new observation. Chameleons are just amazing creatures.

I hope you enjoyed reading our first Chameleon News Article. We aim to author more articles to show everyone other aspects of reptile husbandry that we might have insight on. We believe in giving our animals a great life. We are dedicated to teaching the world about herp husbandry, wildlife conservation and eventually we hope to provide a home for displaced reptiles through GibbonsRock.org.
References:
Nieberding, J.S., Boom, S. 2008: A free range habitat for Meller's and other large chameleons. http://www.instructables.com/id/A-Free-Range-Habitat-for-Mellers-and-other-Large-/

Suzanne Boom & Jim Nieberding

Suzanne and Jim have been keeping chameleons for as long as they’ve been keeping each other (5 years). Though they started of with more ‘common’ species, such as veiled and Jackson’s, it was the melleri that truly stole their hearts. They also share a strong passion for the true masters of the chromatophores - the cephalopods (octopus, cuttlefish, squid) - and it was on a research expedition to study the visual ‘language’ of reef squid that Suzanne and Jim first met each other, on a tropical island that neither of them called home.


Join Our Facebook Page for Updates on New Issues:
© 2002-2014 Chameleonnews.com All rights reserved.
Reproduction in whole or part expressly forbidden without permission from the publisher. For permission, please contact the editor at editor@chameleonnews.com
