


DIY Large Outdoor Free Ranging Enclosure
By Zerah Morris
Citation:
Morris, Z. (2007). DIY large outdoor free ranging enclosure. Chameleons! Online E-Zine, February 2007. (http://www.chameleonnews.com/07FebMorris.html)
Since I began keeping chameleons one of my primary goals has been the replication of environments. The single most frustrating aspect of accomplishing this goal has been exposure to weather, and more importantly sunlight. Hauling cages in and out of the house on nice days became a drudgery I soon gave up, and my collection was subject to life under artificial UVB and the weather conditions I could replicate indoors. However early last spring the addition of a new species to my collection spurred me to again revisit this frustrating problem. With the rapid growth and finished size of the C. parsonii parsonii I had acquired, I knew I must find a way to make outdoor housing an easier reality.
A mid-summer visit to the OKC Zoo inspired me. There, butterflies were kept free in large flight cages for visitors to trample on and enjoy. After some research I came across an article detailing the construction of a flight pen for raising quail. With some consideration I realized that it might provide the best solution to a large permanent outdoor chameleon run, where chameleons could be placed to roam free when weather allowed. I decided that the material of choice for a small prototype would be PVC because of its availability, ease of construction, and durability.
The design was created in a 3D modeling program and test bends done on various diameters of PVC. What follows is the final design and a log of the chameleon runs construction.
Frame Construction
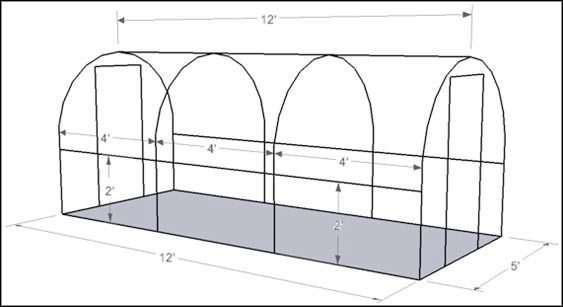
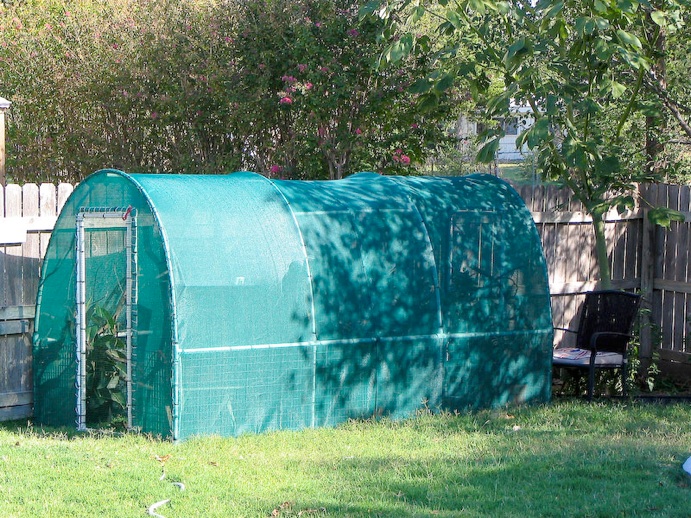
The final dimensions created a run 12’ x 5’ x ~6’. The bottom section is constructed using 1” diameter schedule 40 PVC. The “hoops” were constructed out of stock 10’ sections of ¾” diameter PVC.
-
•Parts List Hoop House Frame:
-
•(10) 10’ 1” SCHD 40 PVC
-
•(4) 10’ ¾” SCHD 40 PVC
-
•(4) 1” 90deg side out L
-
•(12) 1” T
-
•(4) 1” 4way
-
•(4) 1’” L
-
•(8) 1’” to ¾” flush bushing reducer
-
•PVC primer and PVC medium set adhesive
Begin by milling all PVC parts. You can use a hacksaw, ratcheting PVC cutter, or if available a power miter saw. You will need the following components.
-
•Cut List Hoop House Frame:
-
•(12) 4’ 1” PVC
-
•(12) 2’ 1” PVC
-
•(4) 1.5’ 1” PVC
-
•(4) 6’ 1” PVC (door uprights will be trimmed to fit)
Now that you have everything down to size you want to test fit the entire frame. This is made faster with some help but can be done on your own. Be sure not to push the fittings so tightly that you cannot separate them. Begin with the base using the 1” 90 degree side out L’s for the corners. The 5’ width is composed of 1.5’ PVC, T, 2’ PVC, T, 1.5’ PVC. Once the base is together add the 2’ uprights then the upper rail. Now inserts your 1” to ¾” flush bushing adapters into the remaining ends for each fitting. Insert a full 10’ length of ¾” PVC into the reducer on one side and walk it down into an arc until you meet up on the other side. If you have everything correctly assembled it should look something like this.
Now take the whole thing apart. PVC adhesion is a chemical weld and it is highly recommended that you primer both parts of every connection. If you do this all at once you will save yourself a lot of time. Begin gluing the frame together slowly, once it is stuck it is near impossible to separate. Be particularly careful about the orientation of your fittings as you move around the base. I find it helpful to use a flat surface like a driveway or a workbench to ensure all the fittings line up as closely as possible.
NOTE: The extra stretchers pictured across the “floor” of the frame were added to secure dividers in the interior of the run. They are unnecessary, but if you choose to add them simply cut into the 4’ section of PVC and add a T, you will need ~10’ of 1” PVC extra.
Now that you have the frame glued up you can move on to fitting the doorframes. Simply cut the upright sections of PVC to the desired height add L’s and fit the top cross member. Mine turned out about 5’ tall.
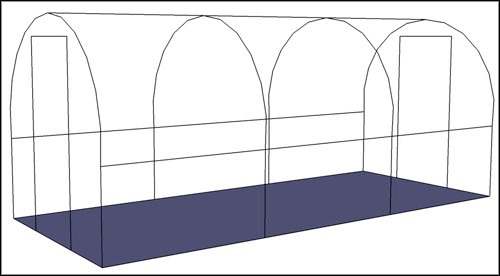
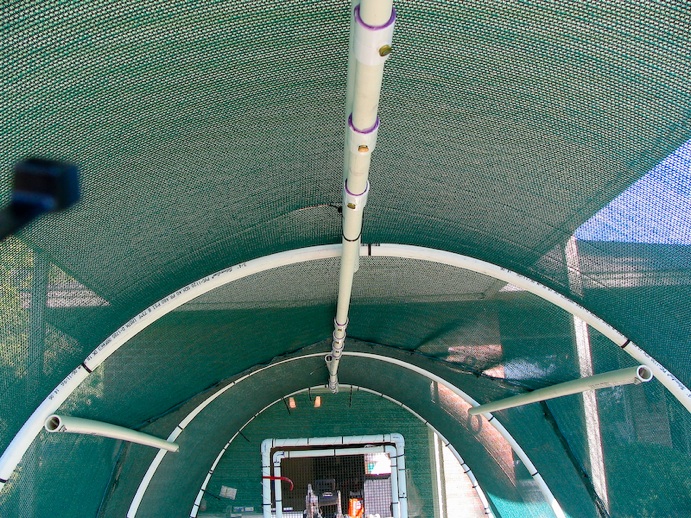
Next cut ~4’ lengths of ¾” PVC and screw them to the peak of the hoops. This will keep the hoops properly spaced and add some rigidity to the structure. You can stagger them as seen in the pictures or run them straight. Alternately if your box store sells PVC in lengths greater than 10’ you can use a single piece of 12’ ¾” PVC for this cross member.
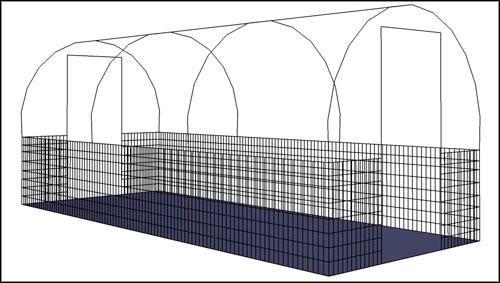
Anytime chameleons will be kept outdoors infestation by predators MUST be addressed. To prevent animals and rodents from tearing through the enclosure I added 1” x1 ½” galvanized hardware cloth to the perimeter of the chameleon run.
Plastic zip-ties were used to secure it. You will find two varieties at most home improvement stores. The black are treated to resist UV rot and will last much longer.
Your frame should now look like this.
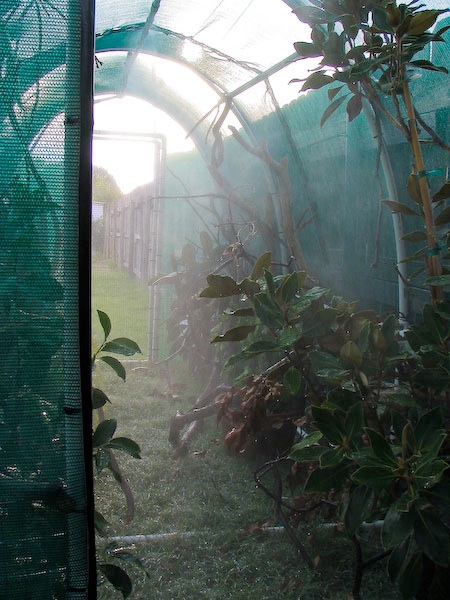
To cover the enclosure and contain the chameleons I choose shade cloth. You can also use specially designed poultry nettings used in flight pen construction. Most home improvement stores will carry three varieties of shade cloth in three colors. Light, medium, and heavy, in black, green, or white (beige). The decision should be based on the final placement of the enclosure and your individual climate. I choose medium and green in color. Depending on where you buy it shade cloth is sold in a multitude of widths and lengths. My local box store happened to stock precut rolls that were 6’x20’. This worked out well as two panels stitched together would cover the enclosure, and leave two pieces large enough to cover each end wall.
Begin by laying the shade cloth over the frame and securing one end to the lower cross member using zip-ties. As you work your way over the frame work slowly and pull the cloth tightly as you go securing it every foot or so with a zip-tie. Again an extra hand and a few spring clams will make things more predictable. If you are working with two panels repeat the process with the second panel being mindful of the overlap in the middle of the enclosure.
Now to join the two pieces. Begin by stretching the two pieces across one another and securing them together with a few zip-ties. Again take your time and stretch the shade cloth as tight as possible. Once secured you will want to stitch the panels together using a blind upholstery needle and outdoor UV resistant thread. Check with you local fabric store and ask them what thread they would recommend for stitching the upholstery on boats or RV’s. A blind upholstery needle can be found there as well, and is simply a large C” shaped needle used to run a stitch when you only have access to one side of the fabric. As an alternative you can have the two panels stitched together by an upholstery shop, before you attach them to the frame, inexpensively.
Now cover the end walls in the same manner. Cut the door opening. Run a blind stitch on the seam created where the end panel meets the top panel once you have secured it with zip-ties.
The doors are created from ¾” schedule 40 PVC. For two doors you will need (4) ~5’ ¾” PVC, (4) ~2’ ¾” PVC, and (8) ¾” L’s. Fit the door parts as tightly to match the doorframe as possible, primer and glue. The door can be covered in many ways including shade cloth. I choose to cover mine in some spare ½” x ½” PVC coated hardware cloth I had from a previous project. Either way secure the covering with zip-ties, and if you use shade cloth run a binder seam around the frame to secure it.
To hinge the door I simply used large zip-ties run around the doorframe and door. To latch the door I used Velcro cable ties found in the electronic section of home improvement or computer/office stores.
Integrated mister:
Any time chameleons are kept outside watering schedules must be increased significantly. I wanted to create an integrated misting system for the chameleon run that would simply screw into a common hydrant timer found at most home improvement stores via water hose. While shopping for supplies for the frame of this project I happened upon a mist head built into a ½” PVC coupling. This product is designed for use as a patio cooling system, but will serve our purposes well. It is manufactured by Orbit and can be ordered offline or found seasonally in the typical box store.
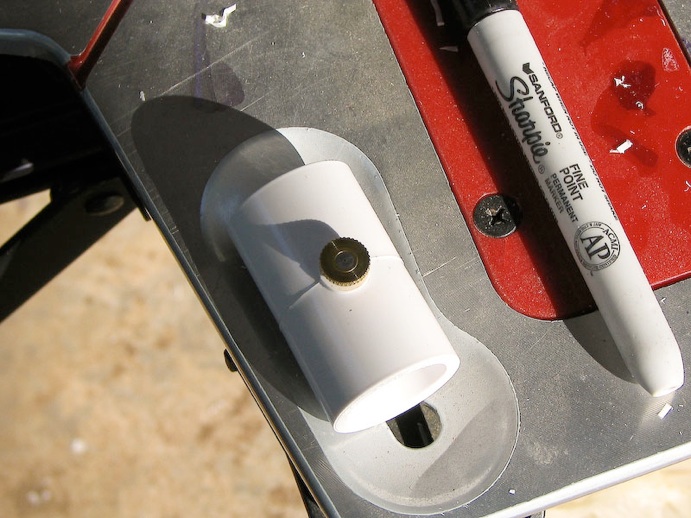
These were sold in packs of 4 where I purchased them. They have a spread of ~2’ at 1’ distance form the head. I used 8 to ensure adequate coverage and offset them to spread the mist pattern to cover as much of the interior as possible. Using one 10’ length of schedule 40 ½” PVC a mist bar was created. Be sure to primer and glue every connection, and do your best to keep the glue out of the mist nozzles.
To connect the mist bar to your garden hose you will need a ½” slip to ¾” male thread adapter. You want to use a food grade water hose to connect to your hydrant timer. These can be found again at your local box store and are often sold as RV hoses in 15’ lengths.
Use:
Now you are done! You simply need to move the chameleon run into final position, and secure it to the ground. I used rebar stakes for this, but as an alternative you could also place it on landscape timbers and screw it down. Either way you just want to secure it to the ground so it does not fly away! Hook up your mister, add perches and plants, and enjoy.
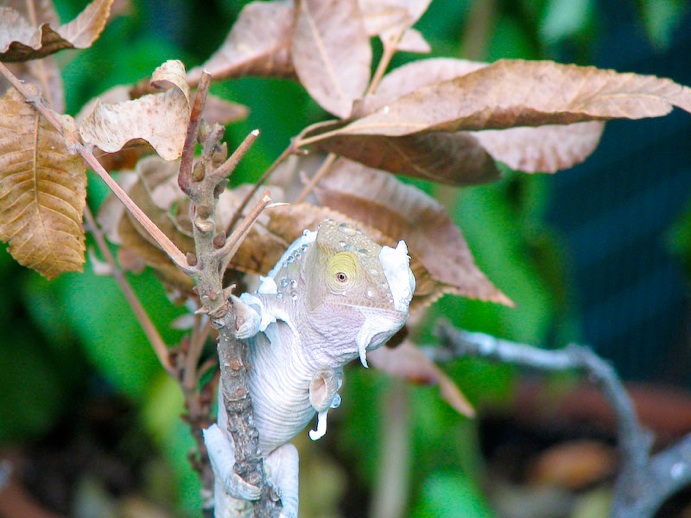
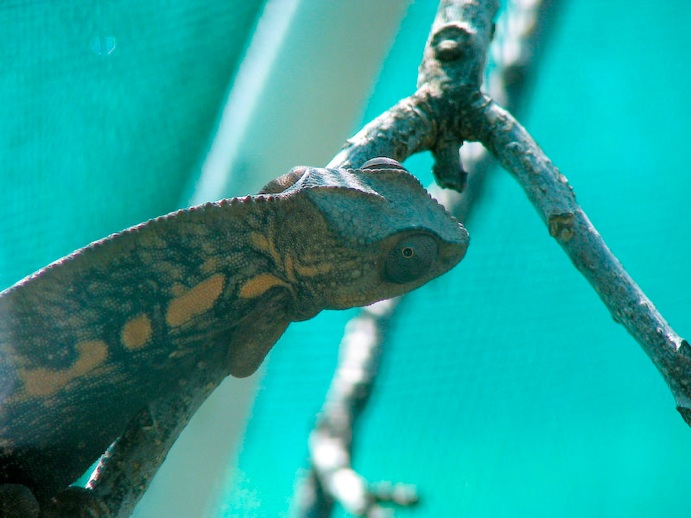
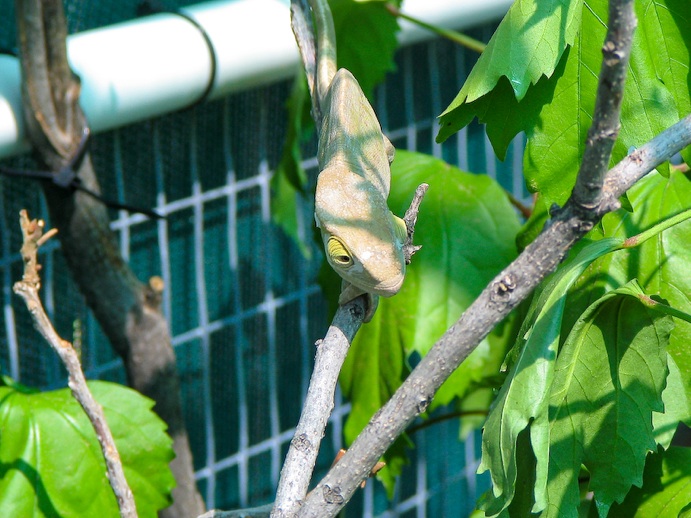
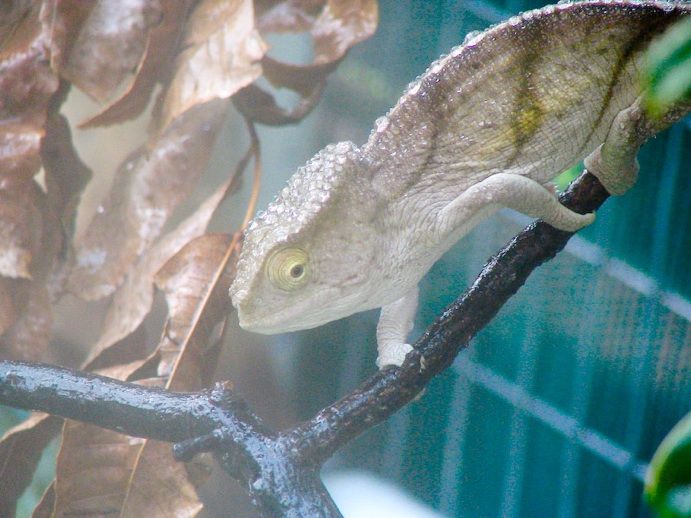
I have found the behavior of the chameleons inside to be much different than chameleons caged indoors. In general they seem more content. Setting up territory they move through daily routines moving up to bask in the sun and then down into the denser areas of the enclosure to sleep and feed. Large aggressive males will need to be separated either by cages inside the enclosure or curtains of shade cloth. It would also be wise to cage very young chameleons such that they do not become prey of larger chameleons or lost in the enclosure.


Note: Keeping chameleons outdoors brings with it a certain amount of risk. It is imperative that you keep a constant watch on chameleons kept in this fashion. Food intake, hydration, aggression, predation, and fitness all must be monitored and the chameleons removed and returned to indoor enclosures when necessary. In addition weather can change quickly so be ready to move your animal back inside in the event of weather parameters outside of safe ranges for your species and experience. The benefits of this type of enclosure cannot be quantified, but the dangers that come along with it must be closely monitored. In addition mixing species and sexes in open enclosures can present problems, DO NOT ATTEMPT UNLESS YOU ARE CONFIDENT IN YOUR UNDERSTANDING OF SIGNS OF STRESS AND AGGRESSION, AND WILLING TO MAKE CHANGES AND BE REACTIVE AS NECESSARY!

Zerah Morris

Zerah can be reached by email at zerah_m@sbcglobal.net


Join Our Facebook Page for Updates on New Issues:
© 2002-2014 Chameleonnews.com All rights reserved.
Reproduction in whole or part expressly forbidden without permission from the publisher. For permission, please contact the editor at editor@chameleonnews.com
