


Constructing a Stump-tailed Chameleon Habitat
By Tom Routhouska
Citation:
Routhouska, T. (2005). Constructing a Stump-tailed Chameleon Habitat. Chameleons! Online E-Zine, June 2005. (http://www.chameleonnews.com/05JunRouthouska.html)
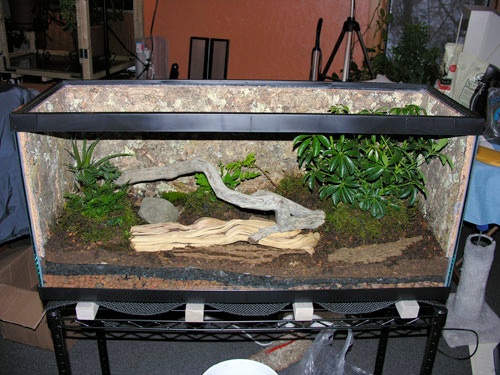
Building a stump-tailed enclosure is a fun and rewarding experience. In the end you will have an aesthetically pleasing environment for your chameleon(s) and a nice conversation piece. One aspect that I really enjoy about building these enclosures is that you have more “ingredients” to work with then you would with true chameleon enclosures. I prefer to keep my true chameleon cages simple (potted plants, plastic bottoms, and vines), whereas stump-tailed enclosures allow me to be more creative since there is a plethora of items to choose from. There are many different types of plants, mosses, barks, rocks/stones, background options, etc. that you can work with that are normally not found in true chameleon setups. This enclosure is a culmination of what I have learned since my first Rhampholeon enclosure built in October 2004. I currently have 7 enclosures ranging from 2.5 gallon to 50 gallons.
Supplies:

Tools:
- Scissors
- Tape measure
- Spaghetti strainer
- Blender (for large charcoal)
- Bucket (to prepare top substrate)
- Antibacterial dishwashing soap and/or bleach
- Hacksaw or wood saw (to trim optional cork flat)
- Glue Gun (numerous uses)
- Patience / Creativity / Forward thinking
Preparing the enclosure:
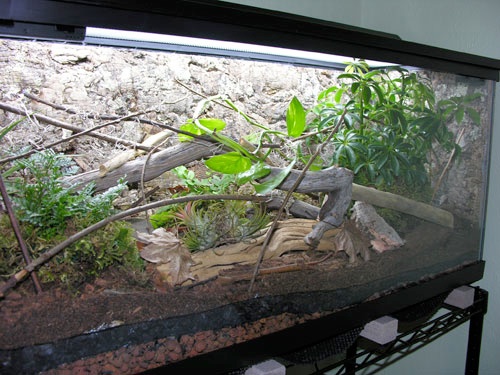
I prefer "tall" aquariums (or something around 16"/17" high) especially for Rhampholeon brevicaudatus. My group tends to spend their time in the foliage/branches as opposed to being on the ground, so taller plants are preferred and therefore a taller enclosure. Some enclosures labeled "long" may also work out well depending on the height. For instance, a 30 gallon long will be 17" high which is ideal for taller plants. Shorter aquariums will do fine though, but you will have to stick to low growing plants like a pothos or other similar vine plants. Be sure to research the intended species to determine if they are ground dwellers or semi-arboreal. All screen enclosures can work with some modifications (so they can hold several inches of substrate), but humidity may be very difficult to sustain.
I prefer to use glass enclosures as apposed to acrylic. Even though acrylic is lighter and sometimes cheaper, I feel that it scratches much easier then glass (others will differ with me on this, but both types have their pros and cons). At some point you will have to take a scraper to the walls of the tank to remove mineral deposits and/or debris such as feeder waste; glass seems to handle the scraping much better. Some tanks may come with a draining hole at the bottom while other keepers have installed these themselves. I have never felt the need for one, but this feature may be useful if the enclosure became over watered by a broken misting system or by some other means. Keep in mind that many tanks with a draining hole are acrylic. You will need special tools to install one in a glass enclosure.
First the inside of enclosure needs to be cleaned with warm soap and water (a 10:1 water/bleach mix will work too). I don't clean the outside until the enclosure is complete. Inevitably you will get hand/finger prints, dirt, etc., on the outside during the setup process, so it's best to clean the outside walls last. If there is a serious buildup of whatever on the outside wall(s) then I suggest cleaning it up now, then a simple wipe down later. Antibacterial dishwashing soap seems to work very well - be sure to rinse the soap out completely. If you are working with a large tank such as a 50gal, then have someone assist you when moving it around if need be. This is also a good time to test the seals of the tank to make sure its waterproof.
Preparing Plants, Fixtures and Substrates:
Plants:
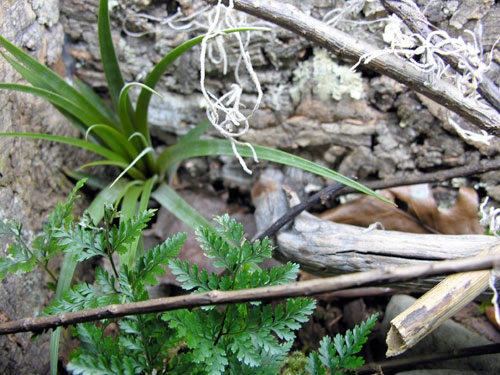
Its best to go with non-toxic plants. Even though stump-tailed chameleons are not known to eat plant matter, it's best to play it safe. Plants should be washed with antibacterial dishwashing soap and rinsed well - then repeated if necessary. I usually soak the plant upside down in the sink for 10 minutes or so. Do not get any soap in the soil during washing and try to find plants that are pesticide free as well. I have had good luck with Wegmans brand dishwashing soap but have had chemical burns to the leaves with Palmolive. I keep the plants in the pots when placing them in the enclosure which makes replacing dead/dieing plants much easier down the road. Keeping the plants in the pots also helps to prevent over watering/drowning of the plant. The plants are kept in plastic pots and not terracotta to cut down on weight. I may also place tiny rocks or bark chips on the top soil for looks. Be sure to wash the plastic pots as well before using.
I have had good luck using miniature palms, bromeliads, and pothos. Even though a small ficus looks good, has nice cover, and ideal branches for climbing, they don't do well (don't like a lot of water) and may need to be replaced every so often. Look for plants that can handle a decent amount of water and low light, don't hesitate to ask for help picking out plants especially at a plant nursery where there should be some knowledgeable employees. Bromeliads, Japanese Bird Nests, and other plants that can "pool water" should be avoided when housing babies or very small chameleons due to potential drowning.
Fixtures:
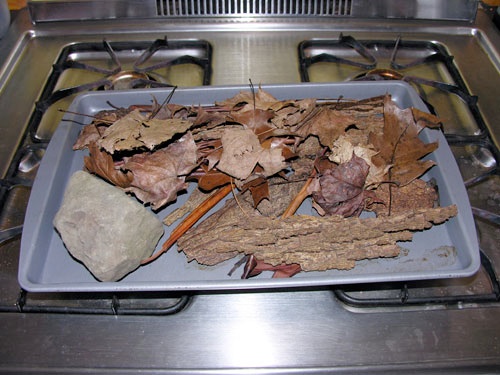
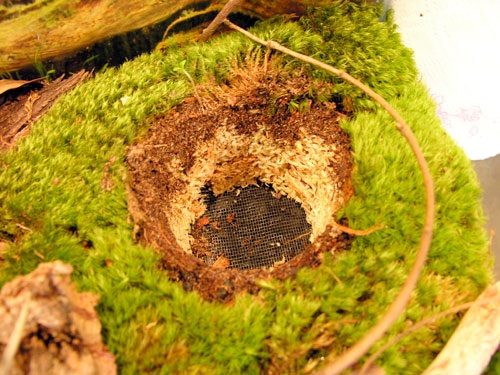
Fixtures such as wood, twigs, rocks, and bark get washed with antibacterial soap (or the 10:1 water/bleach mix) then baked in the oven at 350 degrees for about 30-45 minutes. Leaves get baked in the oven as well but not washed (just a quick rinse before going in the oven). Be careful handling any rocks that have been baked since they will retain a lot of heat for quite some time. Any moss collected outside just gets a good rinse.
Getting Started:
The hydroton gets rinsed with warm water using the spaghetti strainer (or something similar). This stuff is basically fired clay balls (terracotta) so any soap being used will be absorbed and very difficult to fully rinse out. This is another reason why I don't use terracotta pots for the plants.
There are some steps to prepare the charcoal, but its best to complete them just prior to using it. This will be explained later on.
Preparing Plants, Fixtures and Substrates:
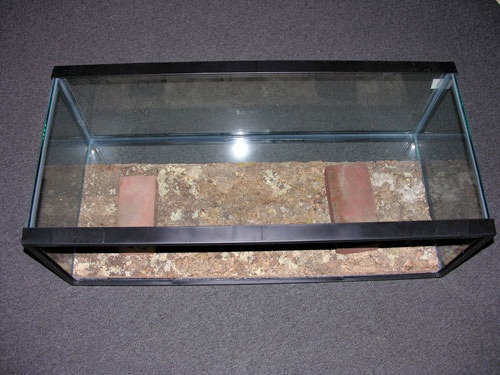
Cork Back/Sides:
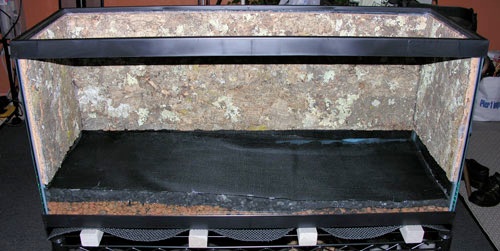
You may have to trim the cork flat a bit in order for it to fit in the enclosure, I used a wood saw to do this. Next apply a good amount of silicon to the back of the cork (on the edges and center of the flat). After the flat is set in place, apply some silicon around the seam where the glass and cork meet - to keep feeders from working their way behind the cork. Tip the enclosure on its back to prevent the silicon from oozing down to the bottom. Then let this dry for a full 24 hours, be sure to sniff around after that to make sure the silicon has fully dried. It may take 2 or 3 days for it to fully dry - a fan blowing into the tank will help with this. Place something heavy on the cork to keep it flush against the tank wall while the glue sets - I used a couple bricks.
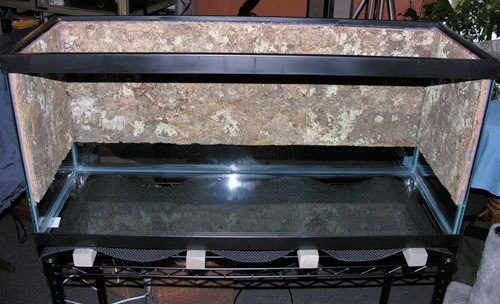
There are definitely some trade offs when using cork flats (or something similar). You may have an adventurous chameleon that likes to climb up it and onto the screen top. From my experience a few chameleons have done this, eventually they get tired of me taking them down. So you may be able to train them to stay off. Feeders can also climb up the cork as well. Cork also shouldn't get overly wet or else it will rot and/or expand. So I try and avoid misting it directly.
If you decided to use an under tank heater, now is a good time to install it before the enclosure starts to get heavy. The under tank heater should be placed on a far side of the tank and not the middle. I wont be using an under tank heater for this enclosure since the intended species can handle (and may prefer) cooler temperatures.
Substrate:
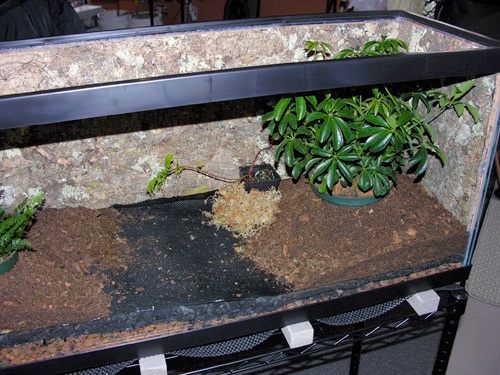
Substrate is probably the most important part of the enclosure. Having proper drainage layers defines whether or not the enclosure will be successful or not. The hydroton is by far the best material to use since it's lighter and cheaper than gravel and has a neutral pH. I placed about and inch to an inch and half of hydroton on one side of the tank and around three inches on the other side. This will give the landscape a sloping effect.

The next layer of substrate is the charcoal; the charcoal acts as a filter and pulls impurities out of the water that seeps down in to the substrate. Before we add that we need to use some of the plastic window screen so we can separate the two substrates. This is where the tape measure and scissors come to use. Cut a piece of the screen to fit the inside of the tank - make it slightly larger then it needs to be. Making it larger prevents the top substrate and any debris from falling down between the glass and into the other substrate/drainage layers. You could use some silicon or hot glue to glue the screen to the sides of the enclosure, but I think that's more work than its worth. You will need two pieces of the window screen - so cut the other while you are at it. Keep in mind that if you have a significant slope, then that will increase the size of the windows screen you will need. Don't use aluminum window screen since the edges after cutting it will be sharp. It's possible that a gravid female digging in the substrate near the glass could get a nasty puncture wound from it. The plastic is also easier to work with.
Preparing the charcoal: The bags I get come in large chunks, so I like to try and grind it down a bit; a blender seems to do the trick. This is a very messy step; charcoal produces a lot of dust so I highly suggest doing this outside. I just rolled the entire enclosure out on my deck for this. Adding a small amount of water to the charcoal (within the blender) helps with the dust.
Some plant nurseries may have it ground down pretty well or they may be able to order it for you. Really try and get it pre-ground. This will save you one messy step.
Once the screen is cut, place one piece over the hydroton layer then add a layer of charcoal over it (about an inch or so). Use a hand mister and mist the charcoal after you lay it down over the screen, this will keep the dust from kicking up. Finally add the last piece of window screening over the charcoal layer. Be sure to blow your nose when you are done too.
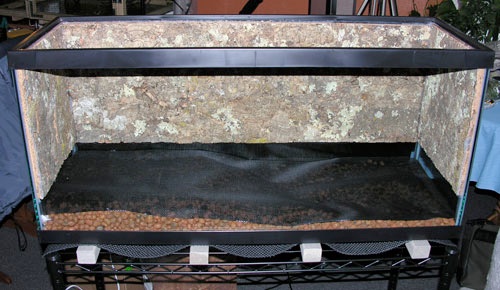
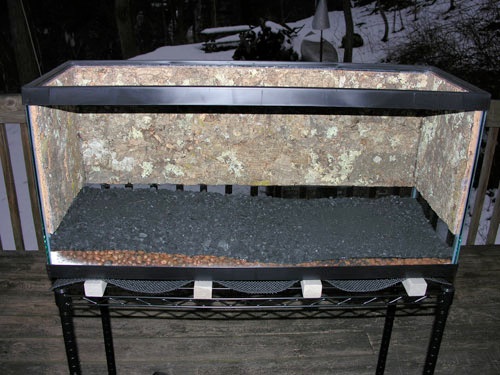
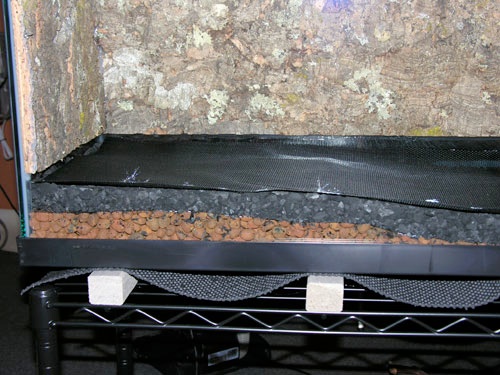
Special Notes: Don't go crazy adding tall layers of substrate. The deeper the substrate, the less room you have for plants and climbing fixtures - less room for the chameleons to move around in too. Unless you have some sort of excessive/compulsive disorder with watering, only 3-4 inches of drainage substrate is needed. In some of my smaller enclosures (2.5 and 5 gallon), I mixed the hydroton and charcoal together to save room. Also keep in mind that some keepers don't use any other drainage layers other then the top soil. This is fine but you will need to be extra careful not to over water the enclosure. No drainage layers also mean that plants can be mistakenly over watered.
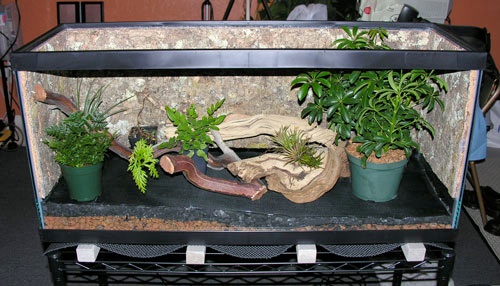
Plants and Large Fixtures:
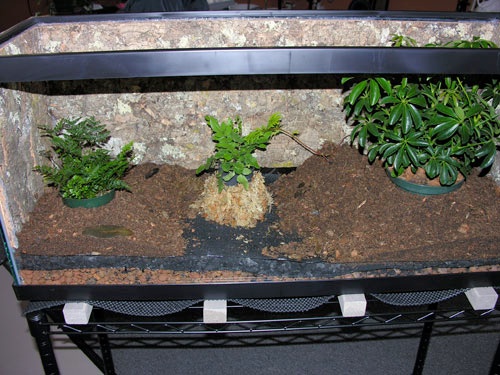
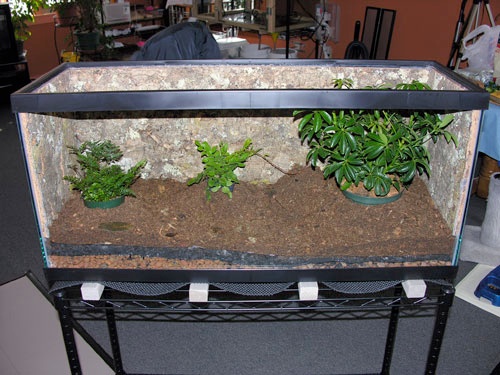
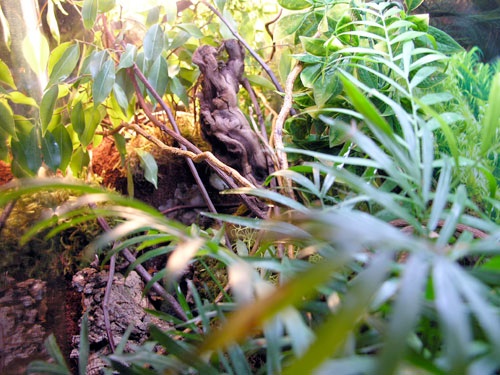
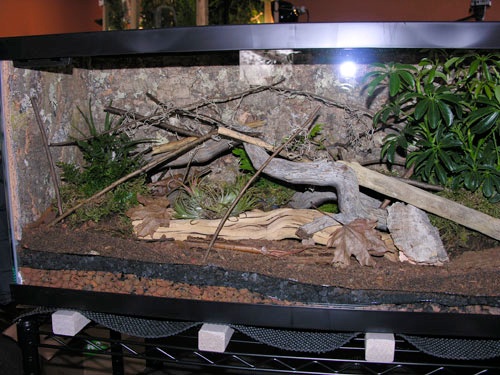
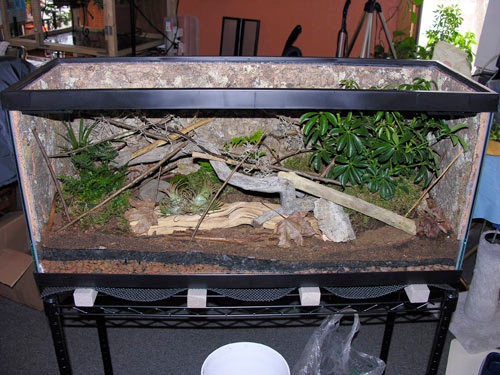
Now is the time to get an idea where the plants and large fixtures such as drift wood and large rocks should be placed. If you decide to have a basking bulb then make sure the plant nearest to it can handle the light and heat. If more than one chameleon is being placed in the enclosure then the less line of site the better - so no "open areas" where chameleons can easily see one another. Once the positioning is figured out, remove the large fixtures but keep the plants in place. Plants shouldn't be tall enough to the touch or be close to the screen top. Chameleons will most definitely attempt to climb on the screen, so trim plants down if necessary.
Final Top Soil Layer:
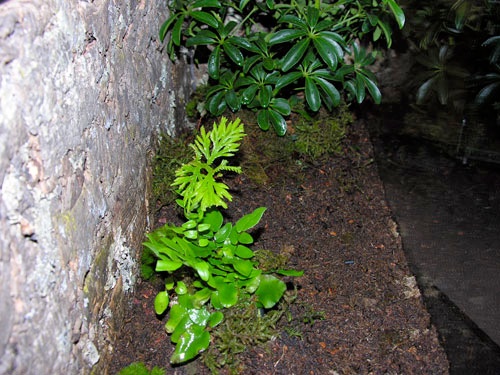
I have been semi-happy with the ground coconut fiber. I find that it doesn't dry out too well if you over water it. There are other options here; some people have put together their own "recipes" for a top substrate which could contain a combination of peat, different types of moss, sand, coconut fiber, etc. A quick search online will give you the ingredients to these recipes and places to buy them online. One thing I don't suggest is potting soil - even organic potting soil. From my experience, this stuff gets messy quick. Even a little water will turn it to mud. So decide on a top substrate (coconut fiber / recipe) and get it prepared. I will be using a pre-made soil mix that I will also add some sand to.
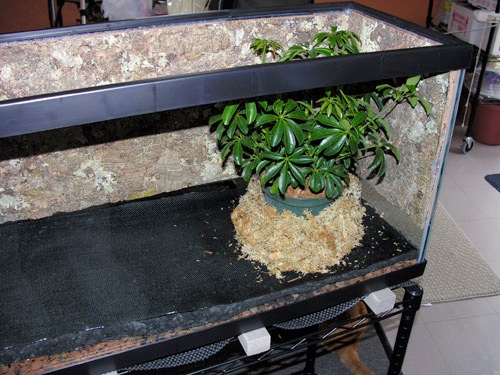
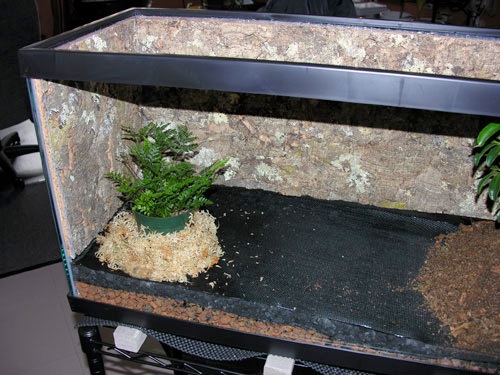
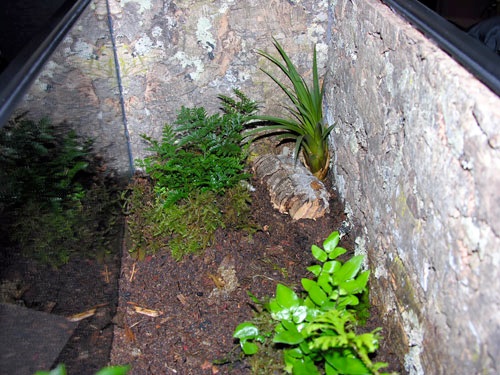
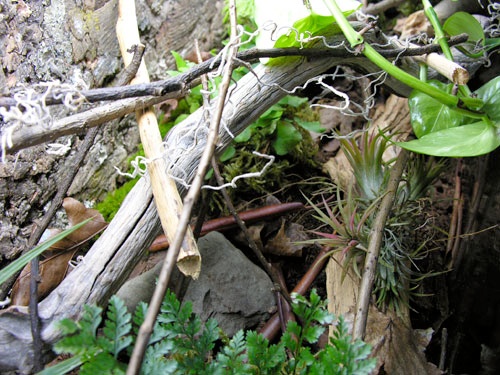
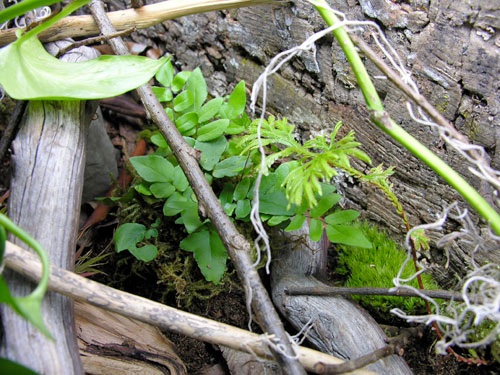
At first glance it would seem that a lot of top soil is needed to hide the plant pots. This can be overcome by surrounding the plant pot with some sphagnum moss. Soak the moss in water then squeeze out about 70% of the water. Surround the plant pot with the moss then lightly pat some substrate over it. This will create "mini slopes" around the plant pots which adds to the contour of the landscape. You can also hide the very tops of the plant pots with some green moss. The final layer of soil should be around 2-4 inches deep - lightly packed down, and I mean light. Packing it down too much will prevent water from draining and/or evaporating. I have read where some keepers don't like coconut fiber since its sticks to the chameleon's skin and tongue. True, but patting it down helps. Also keep in mind that when the enclosure is complete, there will be bark, leaves, rocks, cork etc. hiding a good amount of the substrate.


Everything Else:
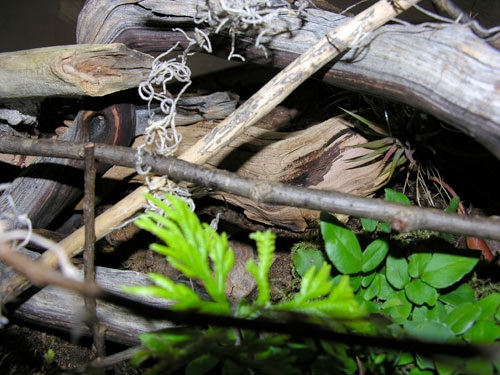
Now put the large fixtures back in the spots where you designated them prior to adding the top substrate. When it comes to where to position things like vines, sticks, small rocks, leaves, cork pieces, moss, etc., there really isn't a wrong or right way to do it. You just need to be creative, look online at other keeper's enclosures to get ideas. Here are some tips:
- If you plan on using a heat lamp, keep plants that are sensitive to heat/light away from it - some moss won’t do too well near the basking light as well.
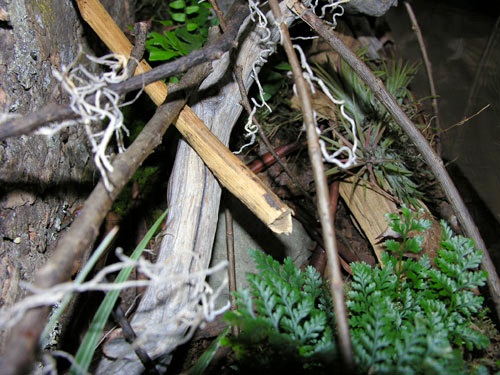
- Makes sure there are plenty of sticks for the chameleons to climb on - especially at different heights. I like to have several only a couple inches off the ground running horizontally to the tank bottom. These make good perches for zapping insects on the ground. Pathways at different elevations also helps with thermoregulation, higher perches will be warmer than lower perches. I also sometimes use hot glue to affix sticks to glass sides or the cork flats.
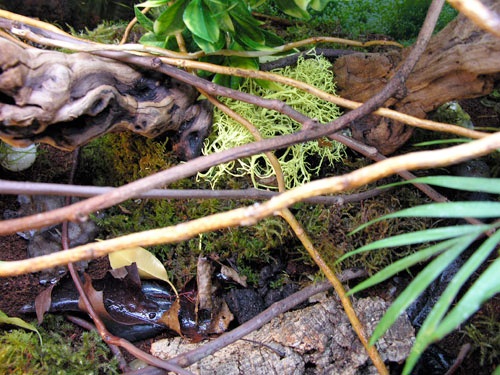
- Crunch some of the leaves you baked and sprinkle them on the top substrate - this creates a more natural effect. I have also place dead leaves and bark from trees in a blender to create natural mulch that I sprinkle on the top substrate. Remember that most species live under the forest canopy where there is little light and not a heavy growth of vegetation. There is however lots of sticks, leaves, moss, bark, etc. on the forest floor. Try and mimic this as much as possible.
- String some Spanish moss from the sticks / perches - this offers extra cover and another way for the chameleon to get up on a perch.
- Remember the line of site. Keep it dense if more then one chameleon is going into the enclosure. The general rule of thumb is one stump-tailed chameleon per 10 gallons (at least for me).
- Try not having any sharp objects like pointy sticks that could cause harm. When creating climbing sticks make a clean, flush cut. Stump-tailed chameleons are not very graceful and will drop to the ground if you disturb them. I had a male with a large gash under his chin that looked like he may have fallen on something. Really didn’t look like a feeder wound or a wound from a non-receptive female.
- Never use heat rocks - ever! I personally don’t think water falls are a good idea either.
- It’s never suggested to house other animals in the enclosure - one species only. I also want to add that it was suggested in the Necas/Schmidt book - “Stump-Tailed Chameleons - Miniature Dragons of the Rain Forest” that it may be fine to add a nocturnal herp to the enclosure such as a gecko. Any feeders that hide during the day and come out at night (such as roaches) could cause harm to the chameleons. A nocturnal feeder such as a gecko may help combat this. To me, this may be worth trying but a lot of research and close observations will be required. I have also read where other keepers have done this with no ill affects.
- If you plan on putting some mantid oothecae within the enclosure, use hot glue to either affix it to a glass wall or the cork back. Make sure to angle the egg case correctly. I feel its best just to hatch the mantids in the enclosure - especially for highly cannibalistic species such as the Asian/Chinese mantid. They have a high die off rate as well so keeping the mantids in a separate enclosure isn’t worth it. I will add fruit flies to the enclosure as food for the mantids and the chameleons. I only place oothecae in my larger enclosures - one good sized oothecae hatching in a 10 gallon enclosure (potentially 200+ mantids) may cause stress to the chameleon not to mention all the fecal matter they will produce.
- Coconut bark chips seem like a good idea but don’t look very natural in my opinion. Seems cumbersome for a chameleon to crawl over. Your call.
-
-I like to plant a pothos vine directly in the top soil. Keep in mind that the clipping needs to be first placed in some water so it sprouts roots.


The Cleanup Crew:
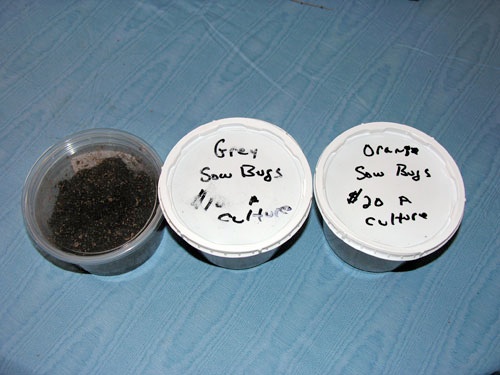
Once the enclosure is complete, now is a good time to add the springtails and sow bugs. The springtails seem very interested in rotting material and fecal matter. The species I have been getting online are very, very, tiny and most likely will not get eaten by a chameleon let alone seen. They reproduce like crazy and seem to thrive in the enclosures as long as the top substrate is kept moist. They are excellent at processing fecal matter that gets missed in the enclosure. They may also help control any fungus gnats that were hiding in the plant soil too. They are pretty much mandatory with all my enclosures.
Sow bugs also enjoy dead/decaying plant matter but not so much the fecal matter. You can find some very colorful ones at reptile shows and online. I have some grey, purple, and orange sow bugs in my 50 gallon enclosure. These are also easy to find outside, just look under rocks and between dead tree bark. From my experiences I have seen a few chameleons zap them but then spit them out, but then seen others readily eat them. So depending on the chameleon(s), your sow-bug population may dwindle after time.
Lights and Fixtures:
Place the screen top over the enclosure. It's best to use a screen top with a hinge. These are easy to find for small enclosures, but difficult for larger ones. I spent a long time online searching for one that would fit my 50g tall but couldn't find one. I ended up just getting a non-hinged top and creating the hinge myself. This wasn't too bad if you have the correct tools. You can get the hinges and machine screws at almost any hardware store. For reinforcement, I got (2) 2" wide, 36" long , 1/8" thick strips of aluminum at Lowes, I didn't have to cut them down since the length of the screen top was also 36". If need be, they could have easily been cut with a hacksaw.
Here is how to create a hinged screen top from a non-hinged one:
- Using a rotary tool (such as a Dremel) with a cut-off wheel attachment, cut the screen top in half length wise so that you end up with 2 equally sized pieces.
- Cut the aluminum strips (if necessary) with a hacksaw to the exact length of the screen top.
- Place the two aluminum strips together on a flat surface and tape the hinges to the strips - I just used some masking tape. Be sure to space the hinges out as needed. The number of hinges depends on the length of the screen top (for 36" I used 4 hinges).
- Using a drill, drill the holes for the machine screws. Some people may just skip the masking tape part and use a marker to mark the holes for the screws, but I find that taping the hinges in place - then drilling is easier and more accurate.
- Now you should have the two pieces of aluminum with the pre-drilled holes. Place a strip on each side of the screen top and use some snips to cut small holes in the screen where the screws will go.
- Now screw the hinges and aluminum strips onto each side of the screen top. The aluminum strips/hinges should be on the top side of the screen.
- To reinforce everything, I used some metal epoxy on the underside. I spread it across with a plastic knife so that the epoxy glues the screen to the aluminum strips above. Let this dry overnight.
- This works well but the underside doesn't look very pretty. If I were to do this again I would use four aluminum strips and not two (for the bottom and not just the top). I would "sandwich" the screen between the strips but also use epoxy in between them.
For this enclosure, I was able to find a premium hinged screen top.
Finally setup the light ballast and bulb with the optional basking dome. If you decide on the heat lamp, be sure to check the temperature with a digital thermometer or temp gun to verify that the temperatures are within range for the species. Keep in mind that some species may need to hibernate during the winter months, so extra heat may not be needed or good for the chameleons. I position the basking light a good distance away; the intention is not to have a basking area but to increase the temperature of the entire end of the enclosure and not just a small area. The heat lamps are on separate timers and only come on in the morning - then turned off a few hours later. For small enclosures such as a 10g, it may be difficult to create a heat gradient using a heat lamp. You really need to be very careful when offering heat to the chameleons, overheating is a common problem with stump-tailed chameleons. Refrain from using any "spot light" type bulbs as well.
Many keepers use "used" repti-sun 5.0 bulbs or new 2.0 bulbs. It's uncertain whether or not stump-tailed chameleons utilize UVA/B rays, but it's best to have a bulb that produces them to benefit live plants. I have been using new 5.0 bulbs in some of enclosures with no problems. If need be, there are plenty of areas where the chameleons can seek cover from the UV rays. I will be using a new repti-sun 2.0 bulb for this enclosure.
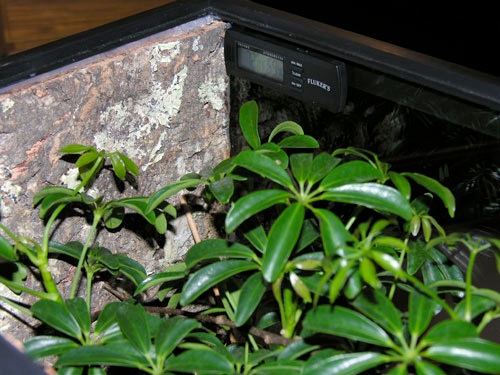
The timer should be set for a 12 hour light cycle for species that live on or near the equator. Oh, and don't forget to put in the temp/humidity gauge. If it's a large enclosure, I like to put a couple in - one in each far corner.
Maintenance:
Fecal Mater: Should be removed daily. I use eight inch feeding tongs to remove it. My groups seem to have designated areas where they go which makes it easier to find. It's not such a bad idea to leave a little bit in there for the springtails and sow bugs to eat. Whenever I see some feces with quite few springtails on it, I usually just let them finish it off.
Fungus / Mold: I have really only seen fungus occasionally in the darker areas of the enclosure. I can typically grab it with the feeding tongs to remove it from the enclosure. It has the texture of a mushroom and it is bright white so it's easy to see - grows in all different directions. Occasionally look under fixtures to find it. I am not entirely sure that this is a health threat, but I remove anything suspicious just the same. So far I have only seen this fungus within enclosures that have the coco fiber bedding.
Mineral Deposits: Will happen quickly if you have hard water. I use a small hand scraper with a metal blade designed for glass aquariums. You could probably find something equivalent at Lowes (something that takes a razor blade). Don't get anything with any type of long handle, it won't give you the force you need to remove the deposits - so stick to something that be held completely in your hand. Deposits can be left on the substrate; they will dissolve after the next misting. I also put the chameleons in critter containers while I do this since the whole scraping action is a little violent. Using a water filter will help prevent mineral deposits. I started using a Brita filter about 2 months ago and it has helped quite a bit.
Escapees: Most of the screen tops on the market have mesh holes plenty big enough for most of the feeders to escape. The feeder of choice with my groups is baby cockroaches. So investing in some "Bug Stop" (a film that you paint on the glass towards the top) may help prevent escapees. Bug Stop is also toxic judging by the warning labels. So if you do add some to the very top of the enclosure, be sure not to get it wet or else it will run down into the substrate. I occasionally leave a piece of orange on a plate near the enclosures. This will attract any fruit flies that have escaped. I then just dump them back into the enclosures. I thought about cutting out the screen and replacing it with something finer but decided against it. A finer mesh will to some extent cut down on air flow.
Dead Feeders: Remove them ASAP. These are starting points for bacteria, fungus, and mold.
Dead Plants: Replacing will be easy if you kept them in the pots. Rock the plant in a circular motion to push the substrate away from it, and then slowly lift the plant out. The hole left behind in the substrate should be slightly larger then the plant pot due to the rocking motion. This makes it easier to put the new plant in. Slowly drop the new plant in and pack the substrate around it. Leaves that drop off are usually fine left in the enclosure and add a natural effect. I don't fertilize plants since I am not sure about the best way to go about it. Since most plants cost only 4-$5 dollars, I am content with just replacing them - for now.
Over Watering (for us rookies/newbies): If this happens, it's good to have a standby enclosure to put the chameleons in while the tank dries out. I use a small personal fan to dry the tank out. Usually after a day or two the enclosure is dry. Keep in mind that the smaller the enclosure the easier it is to over water it. I have been using this pressure mister (Reptile Mister) for my enclosures. It puts out a very fine mist without putting out a lot of water - so it's harder to over water with it than it would be with a traditional hand mister or the larger pressure pumps. Just don't over pump it, eventually the plastic expands from the pressure and hot water - then it will burst near a seem. I don't attach it to anything; I just carry it in my hand from tank to tank. The gentler mist is much more tolerable to the chameleons then with the traditional types as well.
Stagnant Air: Keep an oscillating fan in the room with the enclosure (or open a window if weather permits). Place it in a far corner and not directly next to the enclosure. This will help to keep fresh air moving in the room along with drying out the enclosure between misting. It may also help with decrease the temps at night if that's a problem. Keep the fan away from cold drafty windows as well.
Humidifiers:
It's very common for keepers to utilize cool mist / ultrasonic humidifiers for their chameleons but not so much with stump-tailed chameleons. I currently have most of my enclosures plumbed to ultrasonic humidifiers using PVC. The timers are set for 5 minutes at every hour. It doesn't take much time to fill a tank with the mist - so 5 minutes is plenty. I feel that keeping in humidity with an all screen top is difficult. Most if not all stump-tailed chameleons require high humidity - which can be difficult to maintain, especially towards the top of a tall aquarium and in the winter. As long as the substrate is kept moist, humidity will be relatively high towards the bottom of the enclosure. The practice of utilizing a humidifier has also been suggested in the Necas/Schmidt book - "Stump-Tailed Chameleons - Miniature Dragons of the Rain Forest". It unclear though if the authors are referring to having it in the room or actually plumbed to the enclosure.
Resources:
http://lllreptile.com - Domes, ballasts, lights, heat pads, cork pieces, feeders, wood fixtures, etc.
www.vivariumconcepts.com - Substrate mix, plants, other supplies
www.blackjungle.com - Most of the items you would need for the inside of the enclosure, good "how to" information along with feeders.
http://www.reptiledirect.com/ - Good selection of screen tops. Also good place to find scrapers for mineral deposits.
References:
"Stump-Tailed Chameleons - Miniature Dragons of the Rain Forest" - Necas/Schmidt
"Terrarium Construction Basics" - http://www.blackjungle.com/basics.htm
"Setting Up Your Vivarium" - http://www.vivariumconcepts.com/vivsetup.htm
"Terrarium and Cage, Construction and Care" - Richard D. Bartlett, Patricia Pope Bartlett, Fredric L. Frye
Vivaria - http://home.earthlink.net/~kenuy/vivarpage.htm
"Gradients in Cage Design" - By Bill Strand, www.chameleonnews.com November 2002

Tom Routhouska


Join Our Facebook Page for Updates on New Issues:
© 2002-2014 Chameleonnews.com All rights reserved.
Reproduction in whole or part expressly forbidden without permission from the publisher. For permission, please contact the editor at editor@chameleonnews.com
