


Silkworms!
By B. J. Caruthers
Citation:
Caruthers, B.J. (2005). Silkworms!. Chameleons! Online E-Zine, February 2005. (http://www.chameleonnews.com/05FebCaruthers.html)
FEED MY CHAM A CATERPILLAR? NEVER!!
There was a time when I would not have dreamed of feeding a silkworm (Bombyx mori; Family: Bombycidae), or any other caterpillar for that matter, to my veiled chameleon, Luna. I have been raising their cousins, the wild silk moths (Family: Saturniidae), for 6 years for educational presentations, personal research as well as release for population increase - as some indigenous species suffer serious decline. I nurture each - from egg to adult release (10- 12 months) - and the thought of one of them (or their B. mori cousins) as food was horrifying to me! Even after learning the nutritional value of the calcium rich silkworms, I did not even consider it. Then, December 2003, Luna became gravid with her first infertile clutch, and was determined not to eat anything I offered, therefore not getting the nutrients she so needed - especially calcium. Desperate times, desperate measures. I ordered my first little batch of silkworms and finally began to offer them to Luna - though I could not bear to watch her shoot and eat! In the interest of her health, I continue to offer them to her occasionally and when she is gravid - before her hunger strike begins, which can last weeks. Though I admit, I still turn my head when I offer her an adult moth. My experience in rearing Lepidoptera (moths and butterflies), in general, made it easy for me to care for silkworms and eventually begin my own small colony to save on cost.
Does your cham love silkworms? Oh, you haven’t tried them yet? Maybe because they seem so expensive, ordering batch after batch or having them die before they are large enough to feed to your cham. Help has arrived! The intent of this article is to give you what you need to know in order to raise them for an ongoing supply - or just to find out about proper care for the time you have them - and some hints and tips that have worked well for me. Much of this is geared to the individual who wants to maintain a colony for their own use and not go into the business, but the basics are the same. There is much information available on this subject, so while I will not reinvent the wheel, I will give you the fundamentals and methods that have worked for me along with links to additional information and resources.
A QUICK (I promise) LESSON IN TERMINOLOGY, BIOLOGY AND HISTORY
Terminology
The larva, or caterpillar, is the stage between egg and pupa and will shed (molt) its skin four times (the period between each molt is called an instar) and then one final time as the new skin below is hardened, thus forming the pupa. Some Lepidoptera have naked pupa (these are typically earth pupators like hornworms) and the others form a cocoon of silk, a firm membrane such as the chrysalis of butterflies or other protective attire for their quiescent period known as diapause. (Note: larva/pupa = singular; larvae/pupae = plural)
The pupal stage is the period of final metamorphosis into the adult (imago) moth or butterfly. Without going into the specific physiological process, very simply put, the larva, as we knew it, more or less liquefies and all the parts are restructured, thus forming wings, antennae, etc. For example, the three pair of legs you see at the front end of the caterpillar are the true legs and are the only ones remaining in the adult form. These are the ones they hold their food with as larva. The others in the middle and rear end are called prolegs and are used to cling to a branch while feeding, molting or spinning and “disappear” in the adult stage. The time spent in the pupal phase can be as short as a few days to over 12 months. The Lep at hand, our little silkworm, remains in this stage for about 2 weeks.
Biology
Understanding the basic anatomy of your silkworms will help you in breeding them. If you are just keeping them short term in order to feed off and then ordering from a breeder, you do not have to know this - but the information is here for those with a curious mind.
In brief, an insect does not have a “brain” at least not in the sense of thinking as we and other mammals do - they are more or less mechanical creatures. When we see them move, fly, sting, feed, etc., it is all in response to light, temperature, threat and other environmental factors. Like a salmon swimming upstream to spawn, insects just do what nature has “programmed” them to do. Our little silkworms are no different. Insects have a hormone called the juvenile hormone (JH), which is responsible for triggering each molt. As the JH decreases with time, the insect is then closer to its adult stage.
Insects do have a circulatory, reproductive, digestive and central nervous system, - not unlike other organisms, regardless of how many feet they may have! The most important system for you to be familiar with is their circulatory system because their “heart line,” which runs along the dorsal (upper) part of their body, is a telltale sign of nearing pupation.
All insects take in oxygen through spiracles, which are small openings along each side of the thorax and abdomen. If you dust a silkworm and your cham does not eat it, I suggest putting it in a separate container with food and expect that it may die. Premature mortality may ensue because the dust can obstruct the airflow.
History
The silkworm, Bombyx mori, which we are discussing here, is the one that has been bred specifically for the silk industry, which is always striving to produce stronger silk & other various attributes through breeding. Believe me, the original Bombyx mori, was most likely quite different from what we see today after all this human engineering; they are designer moths - in more ways than one! These moths are indigenous to China where the silk industry began thousands of years ago. A fascinating fact about these creatures is that their silken cocoon is made from one single strand - which can be up to one mile long! Imagine! In the industry, they boil the cocoons to kill the pupa inside because if the moth were allowed to eclose (emerge) it would cut the single strand of silk and render it of little, if any, use. True, many other moths produce silk, but it is not used on a large scale for a number of reasons, such as color, opacity, length, strength and feasibility of producing it in large quantities. There are some individuals who make silk products and will use the empty cocoons - with no interest in killing the moths - and will use those of other species of silk moths (Saturniidae), as well.
BEFORE ORDERING - POINTS OF CONSIDERATION: TREES or CHOW?
Silkworms will eat one of two things: leaves from a mulberry tree or a specially made artificial diet referred to as silkworm chow. That’s it. People may tell you they will eat carrots, lettuce, or some other food and in fact they might, for a short period, but they will not be able to complete their life cycle on such a diet, so don’t waste your time. If you DO discover another food that will sustain them through their entire cycle - you have hit pay dirt, my friend!
Mulberry Trees
White Mulberry (Morus alba) is typically the one used for rearing silkworms, but they will also feed on red (M. rubra) or black (M. nigra) - with one exception being the fruitless cultivars, which can have very hairy leaves and are not as readily consumed. Mulberry is relatively easy to grow if you are within its range, which includes most of the U.S. * These are deciduous (drop leaves annually) trees so keep in mind that in its northern range it will loose its leaves in winter and you will need to have chow on hand for those months. In its southern range, you still have leaf drop but different species leaf out at different times and can provide foliage for a bit longer period. Check with your local nurseries and/or University Extension - just plan accordingly for many hungry mouths! If someone in your neighborhood has one and you get permission to collect some leaves (don’t strip the trees bare!), BE SURE THEY DO NOT USE ANY BIOCIDES (pesticide, herbicide, fungicide, synthetic foliar fertilizer, etc.) or you will have a container of dead silkworms.Â
Tips & Pics :
v * Be aware that mulberry is considered invasive in many states and may not be sold. The USDA Plants Database has information USDA Plants Database (Morus alba)
v See resources for more info on growing mulberry


Silkworm Chow
The recipe for silkworm chow is available, but unless you have access to all the ingredients and can provide sterile and optimum conditions when you make it - don’t bother. Leave it to the folks who sell it commercially and buy from them. The chow can be bought as an uncooked, powder or already cooked. I always get mine in powder and cook it up as needed. The powder, if sealed in airtight plastic bags/container, will keep in the fridge for at least 6 months. Once the chow is cooked, it will keep for about a month provided you do not contaminate it in handling, or after preparation. If you plan on rearing a lot of larvae, then make sure you have enough mix on hand so you don’t have to pay for overnight shipping just for the chow mix!
Preparation
Whomever you get your chow from will certainly include instructions, but I am giving them here so that they are even more readily available. These instructions are provided by Mulberry Farms.
COOKING INSTRUCTIONS (For Powdered Silkworm Chow)
MICROWAVE OVEN (preferred method)
CAUTION: Use at least a 1 1/2 quart microwave safe container at least 5 inches deep for each 1/2 lb. packet of Chow or it may boil-over.
1). Add 1/2 lb. of powdered Chow to 24 ounces (3 cups) of hot tap water and mix thoroughly by hand until all traces of powder are gone. (A wide butter knife works well for mixing.)
2). Place a sheet of plastic cling wrap over the top of the container to retain moisture.
3). Cook on high for several minutes until mixture begins to boil (it will puff up and rise to about one-third higher than its original level).
4). Turn off microwave and stir for a few seconds for uniform consistency.
5). Repeat step number 3 (for about 2 minutes), and then step 4 again.
6). Immediately place a sheet of plastic wrap inside the container and press it against the chows surface so it clings directly to the surface of the hot chow. This will prevent excessive condensation from forming and help keep the chow sterile.
7). Allow to cool and then put lid on and place into refrigerator.
8). Remove from fridge, peel back plastic wrap, slice and serve when firm.
After the Chow cools, it should have a consistency similar to soft cheese.
WARNING: Do not handle the cooked Chow unless your hands have been thoroughly washed. Silkworms are very sensitive and susceptible to bacterial problems if their food is not kept sterile.
NOTE: The cooked Chow will keep for a month or more in the refrigerator if kept airtight. The powder can be stored for about 6 months if kept in a cool dark place, or longer in a refrigerator (WE RECOMMEND REFRIGERATING)
Each 1/2 lb. of powder makes approx. 2 lbs. of cooked Chow, enough to feed/grow approx. 500 silkworm eggs into 1 1/2 to 2 inch long worms.
Tips & Pics :
v Follow the directions and you should have no problems
v Be Careful! The steam released after opening the cling wrap is very hot! (212+ degrees F can leave a painful burn)
v I suggest using glass rather than plastic as there are still questions as to which chemicals can leach from plastic to food
v Wash hands before, during and after preparing!
v Use CLEAN utensils. If contamination happens, you will be throwing out a whole batch of chow - and maybe your larvae, too!
v I cut my chow into smaller chunks and wrap individually so that if there IS any accidental contamination I only lose a small amount (see photos)
v KEEP IN MIND that switching larvae from chow to mulberry is not a problem but switching from mulberry to chow can be more difficult. Therefore, it is recommended that you begin with whichever food source you can sustain. If you must switch, slowly take away mulberry and then remove completely so they have no choice, but expect some loss.
v Yes, the cooked chow does smell - reminds me of old cigars!
v Oh, did I mention - keep it CLEAN?!?!
Silkworm Chow - Powder
Silkworm Chow - Cooked and sliced
Feeding
Chow - cut, ready for feeding or storage

EQUIPMENT FOR KEEPING & REARING
You can rear your silkworms in a few different ways: in a container on chow or leaves, or sleeved on a mulberry tree.Â
Container
Most any sort of plastic Rubbermaid/Sterlite box will suffice. The size of the container will depend on the number and size of the silkworms. You can have many in one container when they are in their first couple of instars but be prepared to separate and move them into larger homes with smaller populations as they grow. I use 2.5, 5 and 10-gallon glass tanks because I have them on hand and find them easy to clean, but plastic will work just fine. You can use these with the chow or leaves.
Cleaning
You eat, you poop. OK, the scientific term for insect poop is frass. Removing frass is crucial to the maintenance of a healthy breeding (and feeding) stock. While small, silkworms produce less and the concern is not as great but as they grow, they will certainly be producing more! I have devised a way to help keep them clean. This may not be practical on a large scale but for those of you who have smaller colonies, it works great! What you will need:
v Empty plastic egg cartons (or anything else that serves the purpose)
v Pieces of plastic canvas (PC) (this is very inexpensive and can be found at any arts & crafts store or any store that carries basic craft material)
v Pointed forceps or hemostats (helpful not crucial)
Place the egg carton(s) upside down in the bottom of the tank/container (this is another reason why I like the tanks as they have squared corners). Cut a piece of PC to fit snugly and rest on top of the empty egg cartons, then place the food and silkworms onto the PC. As they feed, the frass will fall through the openings in the PC! When it is time to clean, you remove the PC (this is where the forceps come in handy in order to grasp the PC) move your larvae and the PC to a safe place, dump the frass, wipe out the tank (or better yet, have another fresh one already setup to relocate them), then replace the PC and silkworms. As they grow, their frass will “grow,” too and will not fall through the PC but it is still easy to clean and allows for airflow so there is less chance of mold.
If you do not use the PC setup, you can place paper towel on the bottom of your container; this will help absorb some of their waste and will give them something to hold onto. Be sure to change it regularly. Regardless of which method you choose be sure to keep everything CLEAN! Exactly what do I mean by CLEAN? Here’s what I do:
˜ Clean all tanks/containers, plastic canvas, utensils and other equipment with a 10% bleach solution (1 part bleach to 10 parts water), rinse well and air dry. Be aware that bleach is toxic so you want to be sure you rinse well.
˜ For general cleaning during rearing, you can wipe any excess moisture from containers with a clean paper towel.
˜ Clean any utensils (during a project) you may be using with a product called Nolvasan (aka Virosan) and hot water (follow product recommendations). Rinse well.
˜ Wash your hands often! Always before and after handling food or silkworms
˜ If you are doing a large colony or handling a lot you may want to use latex gloves for handling food and larvae.
Tips & Pics :
Chow
v MOLD is your biggest concern! It can be a bit of a balancing act when the larvae are newly hatched and very small. You want to keep them in a closed container so neither the food, nor the cat(erpillar)s, dry out - yes, they can desiccate, but you also need to be aware of too much moisture, which can cause mold and bacteria to grow.
v Cover the tank with plexi-glass, plastic, the top of the container you use or whatever is convenient (I use fitted plexi-glass with a few small holes in it for air circulation. Take the top off a couple times a day to allow oxygen in and CO2 out (you do not want a build up of CO2 )
v Do not suffocate these guys! Be sure there is good airflow. If you use the plain container method you can cut out a section and hot-glue screen onto it - be creative ;)
v If one dies - remove it immediately and reassess your setup to figure out why. Sometimes they just die but this usually only occurs in the 1st or 2nd instar. If it is later, it is likely due to too much humidity or contamination.
v If possible, remove any shed skin to provide one less place for decay to begin.
v DO NOT use this setup until the larvae are larger than the openings in the PC!
Leaves
v You can wash and pat dry individual leaves and place in airtight container in fridge - they will remain fresh for a few days this way.
v Cut the leaves into small 1” pieces to give more edges for feeding when larvae is in early instars
v Newly hatched larvae have tiny mandibles and need young, tender leaves to eat. If you give them the larger, coarser leaves, they can starve to death - right in the midst of their food!
Plastic egg carton in bottom of 2.5 gal
Side view
PC on egg
Side view - see how frass falls
Silkworm feeding on leave
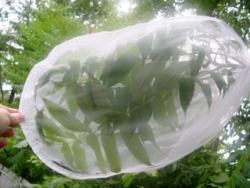
Sleeving as an option
Confining a branch within a sleeve can allow for the most natural environment for rearing many species of Lepidoptera. In the case of silkworms, one would do this only if your climate is appropriate to the needs of this species. If you are raising a lot, live in a very warm climate with minimal drop in nighttime temperature and have mulberry trees on your property - or permission to care for them on a neighbors - then you can sleeve them (if you know a teacher who has mulberry on her/his property she/he would most likely be glad to allow use of trees in exchange for a few cocoons, or other stage, for the classroom). If you are raising only a small amount don’t bother sleeving, just use the container method.
You can purchase or make the sleeves and I have found remay (an agricultural fabric typically used in vegetable gardening) to work well; but inexpensive nylon is OK, too. Sleeves can be ordered (see link below) or made. You can either put eggs directly in the sleeve, allowing the young larva to crawl to the food once hatched or you can move them to the sleeve when they are a couple weeks along so they can finish their feeding. If you want to experiment with just a few, you can buy 5-gallon nylon paint strainers from any hardware store. I don’t sleeve my silkworms because I have no mulberry trees, and live in too cold an area, but I set out most of my Saturniidae species (2nd or 3rd instar) in the small sleeves and move them later to larger ones.
Tips & Pics :
v Look on the branch in advance for any insect predators. A good shake and/or strong water spray on the underside will dislodge many. Granted, you can’t find every one, but do your best and look every time you check your sleeves for any dead silkworms and debris.
v There is always loss in sleeving so you will want to be prudent about outdoor care. Because most silkworm stock comes from indoor or laboratory rearing, you will want to sleeve only if you live in any area where it will remain warm enough, with minimal temperature fluctuation. Ideal daytime temps are 75°-82°and a nighttime drop to 68° minimum. When rearing outdoors high humidity (60-90%) is also required.
v You can make a diagonal cut in the lower corner of a sleeve where the frass will roll. Open it to empty, and then tie it up with string until the next day’s cleaning.
v Sleeving can be a more labor intensive and time-consuming method and may not be appropriate for your needs; you will have to make that assessment yourself.
v If you are interested in learning more about this method feel free to contact me through the ChameleonNews.com editor editor@chameleonnews.com
v Mulberry fruit is delicious and you can add it to your other feeder insects’ gutload, feed it to your veiled - or eat it yourself!
These are not sleeved silkworms but will give you an idea of the setup.
Small “paint strainer”
An Automeris io larva inside a sleeve
Large and small sleeves
Held up off ground with string
WHICH CAME FIRST - THE MOTH OR THE EGG?
OK, I can’t answer that with absolute certainty but fortunately, when it comes to raising silkworms, it doesn’t matter which life stage you begin with: eggs, larvae, pupae/cocoons or adult moths. There are pros and cons to starting with each but the most important aspect is to get healthy, quality insects from a reputable breeder - just as you would when choosing your chameleon.
FEEDING AND LIFE CYCLE
Mail Call!
Your box of silkworms just arrived and it is time for their new home - which of course you have all set up now, due to my wonderful instructions, right?
Eggs
If you ordered eggs they were shipped one of two ways. If shipped overnight with cold pack take out what you need and put the rest in the fridge (crisper drawer is best as temp stays more consistent). If you are planning to hatch them all right away then they were probably shipped regular mail. Keep in mind that once they are out of the fridge for any length of time you cannot put them back in. Once they are exposed to warmer temperatures they begin to finish development in the egg and if you interrupt you will likely kill them.
Put the eggs in a clean dry Petri dish and monitor daily. They are best kept at approximately 80° in order to hatch within a week to ten days. You can use an incubator, I never have but I never hatch out more than a few dozen at a time. Once they begin to hatch, have your chow ready (or young mulberry leaves available). Place strips of chow into the dish and the larvae will find their way to it and feed (excellent photos Here).
Another technique I have used is to place about 6-12 eggs in each section of a plastic bait or craft box; once hatched, Â put in sliced chow accordingly. I use these to start all my Saturniids and find it easy to maintain moisture/ventilation balance simply by opening the lid several times a day for a minute or two to provide air exchange.
Tips & Pics :
v Keep eggs out of direct sunlight. They are best kept in a dark place until hatching - just don’t forget about them!
v Mulberry Farms has an easy do-it-yourself incubator
v DO NOT put fresh foliage in with eggs - CO2 build up can kill the developing eggs!
v Bait or craft keepers can be found at most discount department stores. They come with dividers, which you can use to make more, or fewer, sections
v Photos below are not silkworms (they are Actias luna), this is just to show the box I use

LARVAE
If you ordered larvae, they were shipped with enough cooked chow or mulberry leaves to get them through the trip and probably for a few days after. Shake out the frass, and then place them into their container (or outdoor sleeve). You can grate the chow over them as this gives many “edges” for their little mouths and is fine for smaller ones. I find that this method dries out the chow faster and I prefer to slice mine.
The optimum temperature for your larvae is about 75°-80° and you want to keep them relatively dry. If you live in a climate where there is a large drop in nighttime temperature you may need to improvise with a heat mat such as a plant propagation mat. DO NOT PUT THE CONTAINER DIRECTLY ON A MAT. You can purchase a rack that allows airflow for the heat and set them on this. One way or another you will need to monitor average temps. If the temps drop it will not kill your larvae, but you may get condensation build up which in turn causes mold, which in turn CAN kill your larvae. So check and wipe dry as needed
Newly hatched and young larvae should not be handled as they will easily crush, be exposed to contaminants and other death sentences. If you absolutely have to move them for some reason use a small, fine, artist’s brush. Put the brush up against the side of the larva and gently roll it under, in order to lift it.
Silkworms produce a lot of silk, even as caterpillars, and will create silken paths that they use to stay secure on their food source and to each other - they are a very gregarious species. Do not try to remove this as you will find the cats will be attached; however do not mistake it for mold either. You will soon be able to determine the difference. As they get larger, you can move them with less concern but still be gentle - they are delicate.
Feed off your silkworms at whatever size is appropriate for your animal(s). You can place them on a branch and let them crawl until your cham sees it and shoots or on your finger to hand feed. Most chams devour these - for a while at least.
Tips & Pics :
v You will notice that the larvae grow at varying rates. Once again, as in nature, this is all about survival. Even though we have bred much of “nature” out of this Lepidopteran species, some biological processes cannot not be fully defeated!
v The silkworms do congregate and become tangled in each other and their silk. This is probably a sign you have too many or not enough food for everyone. I tend to keep fewer together than most people do and there are no hard and fast numbers. This tangling can be a guide.
v Their shed skin just looks like a deflated silkworm
v Note to those in a cold climate: in case of power outage you can use a shipping heat pack (ex. UniHeat) placed in the corner of the container.
Molting
This is a time when they are especially vulnerable. Molting is a tricky process and being disturbed can prove fatal - so keep this in mind when cleaning, feeding or moving them. How do you know when they are molting? Caterpillars, in general, have very poor eyesight and respond mainly to vibrations and to some degree, light and dark. When you approach their home, they may all suddenly stop feeding and “look up” - this is actually a defensive posture. As much as you may like to think they “know” you and are waiting for your company this is not the case - they actually think you are a predator! In nature, many Lep cats use this to ward off predators (scary to some little 6-leggers!) and remain perfectly still, thus “not seen.” When they molt they often hold this position but you will notice it lasts for a few days. They will often climb the glass a bit or move off to a corner when they are ready to molt and you might notice them shudder and twitch, but this is all part of the process. Do your best NOT to handle them at this time. They put down a small silken pad to secure themselves in one place (in nature this secures them to a tree branch or stem so they will not get knocked off) and by removing them you can cause serious damage. Unfortunately, they don’t all molt at the same time but do your best to take care when you move them.
Note : one way to determine if a silkworm is molting or dead is to touch it (gently, with a fine artist brush) and if it responds it is alive, if not, then remove it (and any surrounding food) immediately.
Discarded shed
Two larvae on glass in “molt pose”
Molting

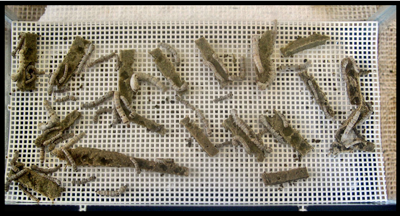
SPINNING & PUPATING
If you plan on buying your silkworms from a breeder, raising them and feeding them off, you can stop reading here. For those of you who want to actually breed and maintain an ongoing supply -keep reading!
Obviously, if you are interested in beginning your own supply of silkworms you will need to let some develop through their final instar in order to begin the mating process! I think (hope!) you also know you will need both males and females; though the only way to determine sex in the larval stage is to dissect them - sort of defeats the purpose, huh? You can make an educated guess to their gender by their size: females are larger than males and tend to feed longer as well; however, this is pure conjecture and subject to your untrained eye. My trained eye is sometimes wrong with my Saturniids and I have eyeballed and kept records on many of them over the years. So, the bottom line is to keep, at the very least, a dozen and preferably more. You can certainly use less but be prepared for loss during the pupation period.
In general, those reared on chow have a lower success rate of full development than do larvae reared on mulberry leaves. As good as the chow is it cannot replace nature’s recipe! Artificial diets were first created for sustaining Lepidoptera used for scientific research in laboratory environments and were not intended as substitute food to create or sustain large populations. Companies like Sericulum refuse to use it in their research since their goal is to provide the best quality specimens; however, for those of us in the north or an area without accessible mulberry, and if you want to rear year round, chow may be the only option and it should produce enough viable adults for reproduction.
OK, that said...the larval stage lasts approximately 23-30 days depending on food availability and temperature. They will begin to wander a bit, often up the side of the tank, looking for a suitable place to spin and pupate. They should not be disturbed once they have begun to spin so when they are in their last instar and large (2 ½” - 3”) it is best to move them to a separate container where they can finish feeding and begin spinning with no interruption.
A good gauge of whether your caterpillar is nearing pupation is when it “clears its gut.” Look at it this way: it is going into a 2-week confinement and needs to empty its system of any built up waste! Another way is that you will notice that its heart line (refer to section on Biology), which runs along its back, becomes obvious and you will see it pulsating. This happens because its skin is so tight and its circulatory system is readying itself for a most extraordinary process. The more you raise the more evident these cues will become. Any one of these signs, or combination, tells you it is time to move them into their spinning quarters. There are several different ways to setup for spinning and John Lucas of Chameleon Paradise has a great description with photos: Spinning Setup.
What Happens When
Spinning will take about 3 days to complete. During this time, they are set in position by securing themselves with a pad of silk. You can actually watch them for a while through the silk if you are so inclined - a very cool thing for kids (and those of us who are kids at heart!). Keep in mind as you watch, that this one single strand of silk they are producing is a series of proteins secreted from special glands, which are then guided through the spinnerets in its mouth. As they spin, they create a smooth interior surface (cut open an empty cocoon sometime and you will be amazed at the polish and strength!), shed their final skin and continue to pupate. This whole process takes another few days and, again, the cocoons should not be disturbed. Once this process is complete they can be safely moved, but unless necessary I would recommend against it
In about 2 weeks, the moths will begin to eclose. They secrete a chemical called “cocoonase” (yeah, guess the scientist who came up with that wasn’t very creative, but then again...) breaking down the enzyme sericin, which binds the silk together, in order to emerge. This leaves a brownish stain in the white cocoon. Besides the cocoonase, they have a hornlike projection at the base of the wing that is used to cut the silk - they do this by heaving themselves against the wall of the cocoon!
You very well may hear them during this process.
If you happen to notice a light brown area at one end of a cocoon and much time has passed with no emergence, you can CAREFULLY cut along the top and/or front (see photos) to help release. Of course, if you are rearing hundreds, this is (probably) not an option but if you are just breeding for yourself then make the effort to help the moth out; there various reasons they can have trouble and die inside.
What to Watch For
As the adult moths eclose they will need something to climb or cling to in order to expand and harden their wings. Due to the way these moths have been bred for the silk industry they cannot fly, which makes mating them very easy, but they still need wing expansion for mobility.
If your moths have not eclosed within about 2 weeks time you may want to investigate. If you see the brown stain, the moth probably died trying to eclose. Shake the cocoon, if it rattles, then it is most likely dead. I suggest cutting all of these open for your own edification.
(Sue Kayton)
MATING - Now the fun begins!
OK, several have successfully eclosed - now what? Sexing adult moths is relatively easy. The females are much larger than the males and have bodies that look out of proportion for their head and wings, (their body is long, too). The males look of normal proportion and are smaller.
You can place them on crumpled wax paper or paper towel but I find a brown paper bag to work best. I use this method for my wild silks (to contain the female) but since the Bombyx cannot fly, you can tear one up and use it as the “flooring” in your mating cage. The paper bag/brown Kraft paper works well because the eggs stick and you can just cut out the clusters and place them into your Petri-dish for their cooling period (no need for gluing). You can do the same with paper towel or wax paper, but I find the sturdiness of the bag to work best.
The Courtship
Although these moths are unable to fly, they can flutter around, just cannot get off the ground. The females generally stay put and “call” in the male. She does this by extending a gland from her abdomen, which is drenched in phermone (chemical attractant) - this is called “scenting” or “calling.” The male moths “smell” with their antennae and will be immediately attracted to the female. He may fumble for a minute as he figures out what to do but they will soon be coupled - note the larger female on the left in the photo below. They will stay paired for many hours and should be left to separate naturally. Soon after, the female will begin depositing creamy/yellow color eggs.
As you can see in these photos, the brown bag technique was used. You can tear around the laying female or a mating pair (be careful not to dislodge them) and place them in separate containers (if you choose).
Once the female has finished laying, collect the eggs (or tear off pieces of the paper with the eggs attached) and put them in a shallow dish and leave it uncovered for three days. When eggs are first laid they are creamy yellow. Over this period, if the eggs are infertile they will turn white, if they are fertile they will turn dark grayish purple. DO NOT put the eggs into the refrigerator until they have all turned gray. If you do cool them prematurely, you will interrupt their development and kill them. In nature, many insects need a chilling and/or quiescent period (diapause) in order to continue their development. In the case of silkworm eggs, this is best provided in the crisper drawer (more consistent temps) of your fridge. They need to remain chilled for a minimum of one month and can be stored for up to five years, but hatching them all out in a years time will lessen loss. You can simply take out the amount of eggs (always take out more than you will need to prepare for loss) what you think you need and start all over again!
Note : eggs can sometimes hatch without a temperature induced diapause, but this is dependent on the temp range during the larval, pupal and adult stages as well as photoperiod (hours of daylight). Even with all of these held at the ideal for non-diapausal eggs there is the possibility that they will not hatch. You can certainly setup your own experiments and do further research, but to insure some hatching I recommend a temperature-induced diapause for the eggs.
Tips & Pics :
v Eggs can be stored in a ziploc bag, small aquarium air tubing (if not on paper), small petri dishes or other small container
v Eggs will hatch within three weeks (dependent on temperature), but more typically in a week or two. If they have not hatched at the end of three weeks it is safe to assume they will not. If you look with a hand lens you will see that they have probably collapsed.
v Females will lay eggs whether they mate or not
v Keep the cocoons warm (not hot, just warm room temp) and make sure they can easily get out of the cocoon and onto something to cling.
v If you have a lot of loss - reassess! Cutting open cocoons may help you figure out where the problem was
v Cocoons are usually white since most of us get our stock from a few sources, but if you end up with a tan, yellow or other white variation do not be surprised - it’s genetic ;)
v Moths do not feed and only live a few days
I had to help this fellow from his cocoon. I heard the racket and after about ½ hour of no eclosion, I decided to intervene. I carefully cut, with very small, sharp scissors, along the top of the cocoon to help free him. He lived to mate and produce offspring.
I had to help this fellow from his cocoon. I heard the racket and after about ½ hour of no eclosion, I decided to intervene. I carefully cut, with very small, sharp scissors, along the top of the cocoon to help free him. He lived to mate and produce offspring.
Large cocoon on left is probably a female and the smaller one a male. Far right: an unsuccessful spin - notice translucency
Successful eclosion notice cocoonase staining
Successful eclosion Top: final shed Bottom: empty pupal case
Unsuccessful eclosion Notice deformed adult on left, empty pupal case, right: final shed, top
Hand rearing silkworms is not a complicated process once you understand the fundamentals and underlying biology. If you begin with healthy stock, monitor temps and humidity, keep hands and equipment CLEAN you should have minimal problems.
Adult male (Sue Kayton)
*******
Of course, there will always be the chameleon who would rather make friends with, than eat, one of these little fella’s!

Hi cutie!, Over here!, If you’re not going to eat me - then kiss me!
Oh, one last thing - if you consider feeding a wild silk moth caterpillar to your cham, I can’t stop you, but just know that these are the beauties they become!
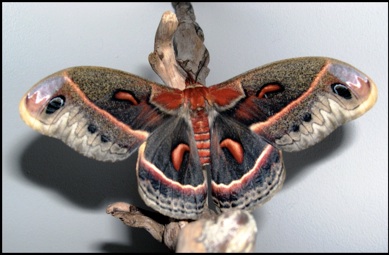
Hyalophora cecropia - Female - 6 ¼” wingspan
Actias luna (yes, my veiled chameleon’s namesake) - Male - 5” wingspan
Automeris io - Female
RESOURCES
Eggs, Larvae, Cocoons & Chow
U.S.
Canada
Mulberry Sources & Growing Information
Aurora Silk: Cheryl, owner of this company, will happily take any cocoons (eclosed or not) for educational purposes and her work. You can email her directly: dyer@aurorasilk.com or send them to: “MAMA D.O.C.” Inc (non-profit), 5806 North Vancouver Avenue, Portland, OR 97217
Life Cycle Photos & General Silkworm Rearing
Sue Kayton's Silkworms (be sure to peruse the rest of this very comprehensive site!)
University Extension Directory

B. J. Caruthers (lele)

Known as lele to fellow herpers, B. J. Caruthers lives in NH with her veiled chameleon, Luna, 2 cats, 2 tarantulas, and many 6 -legged and 4-winged critters. She has degrees in Horticulture and Nature Literacy & Expression and enjoys writing, drawing and photographing her wild silk moths and other jewels found nature.


Join Our Facebook Page for Updates on New Issues:
© 2002-2014 Chameleonnews.com All rights reserved.
Reproduction in whole or part expressly forbidden without permission from the publisher. For permission, please contact the editor at editor@chameleonnews.com
