


Caging Baby Chameleons
By John Lucas
Citation:
Lucas, J. (2003). Caging Baby Chameleons. Chameleons! Online E-Zine, October 2003. (http://www.chameleonnews.com/03OctLucasCaging.html)
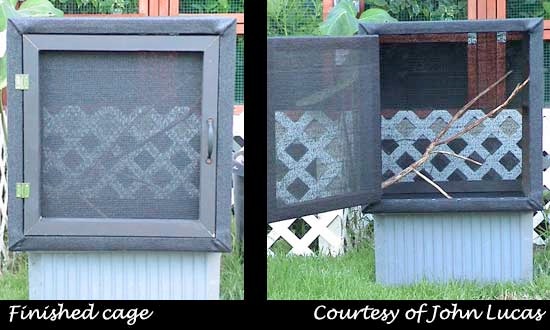
Everyone comes up with different cage designs. Some are for looks, some to match the wood in your house, and some are designed to look good with your landscape. Some cages cost you an arm and a leg and some are cheap. I have to say the most popular cages right now seem to be the Reptarium™. Everyone will have a different opinion on the pro/cons of using them. I think the big popularity around the Reptarium™ is the price for the size of cage you get. Although I have to say the biggest complaint with these cages is the zipper. It always seems to present problems. Keeping that in mind, how do we make a low cost functional cage without zipper problems?
The main issue is cost when making a cage. The Reptarium™ seems simple enough - PVC and shade cloth right! Wrong! The PVC pipe is cheap, but the fittings are expensive and can be hard to find. The only way to secure the screen is by sewing it. But, once again, we still have the zipper to fool with. The way to get around these problems is by using wood in place of PVC as the frame. This solves both problems 1 (no PVC so no expensive PVC fittings) and 2 (no zipper with a wood door). You can make just about any size cage. This allows you to customize the cage around your needs - another plus to building your own cage while saving money.
So, how much is all this going to cost and how much am I going to save? Of course, the whole point is to save you money via Do-It-Yourself so we have to make it cheaper (or better) then buying a pre-made cage. The cages discussed here are very simple cage to build. There is nothing fancy about them and you don't need to be a professional to make them. Let's go over what you will need to build any one of these cages.
Supply List For Any of the Cages in this article:
2x2 Wood
Screen (shade cloth or aluminum window screen)
Door Hinge set
Door Handle
Door Lock
Paint
2 ½ screws
Staples
Tool List:
Miter Saw
Screw gun
Staple Gun
Measuring Tape
Pen/Pencil
Paint Brush or Roller
Now because you can customize the size of the cage around your needs, I can't give a price and plan for every possible cage size. For this reason, I am going to focus on only two cage sizes - one small and one large. I am going to use 24"Lx18" Wx24"H (L= Length, W=Width, H= Height) for the small cage and 24"Lx24"Wx48"H for the large cage.
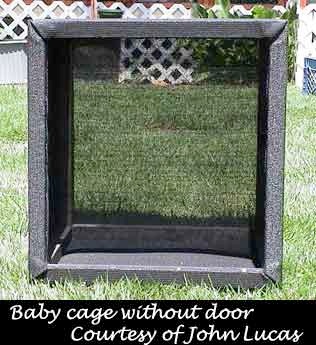
Small Cage (24"x18"x24")
The small cage is a perfect size for housing and growing multiple babies, not too small and not too big. Remember you can always make them bigger or smaller to match your needs!
Supply/Price List For 24"x18"x24":
4- 2x2x8 ($2 each)
1- Roll of screen ($15-30 depending on type and length of screen)
1- Door hinge set ($1.50)
1- Door Handle ($1.50)
1- Door Lock ($2)
1- Can oops paint* ($2-5)
1- 1lb. box of 2 ½" rust proof screws ($5)
1- Box staples ($2)
* "Oops paint" is sold at hardware stores that make custom colored paints. Most home improvement stores will sell it. You will want to find a color you like and a paint that is made for outdoors. This is used to seal the wood since it will be around water.
Total price for the first cage is about $40; now considering you will be making more then one cage the price per cage will be cut in half. (If you need only one cage, a per-made cage may be the best way to go.) Let's say you make four cages. The larger your clutch the more cages you will need. This allows you to separate the babies evenly by size/age/sex. This will keep food competition to a minimum and decrease stress by dominate cage mates. If you were to make four of these cages your cost per cage will be on average $20 (give or take a few dollars). Some items are a one time buy like the paint, screws, staples, screen (if you buy one big roll). The screen is the most expensive part of the cage so, depending on the type of screen you use, the cages could cost a lot more or a lot less. I recommend against fiberglass screen as crickets can chew through it. Multiple cages will save money, so why not make more? The cheapest pre-made cage I could find was $60 for an 18"x18"x30" aluminum screen cage or $38 for 28"x16"x30" Reptarium™.
Cage Plans Step By Step:
1. Paint all wood, I like to do at least two coats when I use paint/stain for wood to be used on chameleon cages.
2. After the paint has dried mark all your wood to be cut, you will need: (4) - 24", (4) - 21", (2) - 20 ¾", (2) - 18 ¾", (4) - 15".
3. Cut all wood with a miter saw. All cuts are straight no angles. If you do not have a miter saw, you can use a hand saw or ask the place where you buy the wood to cut it to size for you. (There may be a small fee!)
4. Paint the cut ends. The fastest way is to just dip the ends into the paint can, and wipe off any extra paint with a rag on the sides of the 2x2.
5. Make the top and bottom frames. I use two 2 ½" screws on each of the four ends. I pre-screw these ends. It makes putting them together much easier. You can also pre-drill if you want. To make the frames you will be using four 24" and four 15" pieces of wood. The 15" pieces go on the inside when making the frame, so each frame will measure 24"Lx18"W.
6. Use the four 21" pieces and attach them to the each of the four corners of the two frames. This will make the whole cage frame, less the door, to attach your choice of screen.
7. Now use the last four pieces of wood to make the door, the two 20 ¾" and two 18 ¾". The 18 ¾" pieces go on the inside when making the door frame.
8. You may have your own way of applying screen. I use the following way - One piece of screen that goes around the top, bottom, and sides of the cage frame. The screen is stapled on the bottom of the cage frame and the front of the cage inside where the door sits when closed. Then add a small piece of screen on the back of the cage. I fold the screen to double it up before stapling, this holds the screen tight.

9. Add screen to the door. Staple the screen on one side of the frame. This will be hidden when the door is closed.
10. Attach the door with the hinge set. I mark 4" from the top of the cage and bottom of the cage and this is where I attach the hinges, then to the door its self. Add the handle and door lock and you are done.
Large Cage (24"x24"x48")
The large cage is great for older sub-adult to adult chameleons. This is a pretty standard size cage, but you can always make them bigger or smaller for your needs. Total price for the first cage is about $44. Now considering you will be making more then one cage, the price per cage will be $10-20 less per extra cage. (If you need only one cage, a per-made cage may be the best way to go.) Some items are a one time buy like the paint, screws, staples, screen (if you buy one big roll). Your choice of screen can make the cage price go up or down. The screen in the most expensive part of the cage. I recommend against fiberglass screen as crickets can chew through it. Multiple cages will save money, so why not make more? The cheapest pre-made cage I could find was $100 for a 24"x24"x48" aluminum screen cage or $82 for 30"x30"x48" Reptarium™.
Supply/Price List For 24"x24"x48":
6- 2x2x8 ($2 each)
1- Roll of screen ($15-30 depending on type and length of screen)
1- Door hinge set ($1.50)
1- Door Handle ($1.50)
1- Door Lock ($2)
1- Can oops paint* ($2-5)
1- 1lb. box of 2 ½" rust proof screws ($5)
1- Box staples ($2)
* Oops paint is sold at hardware stores that make custom colored paints. Most home improvement stores will sell it. You will want to find a color you like and a paint that is made for outdoors. This is used to seal the wood since it will be around water.
Cage Plans Step By Step:
1. Paint all wood, I like to do at least two coats when I use paint/stain for wood to be used on chameleon cages.
2. After the paint has dried mark all the wood to be cut, you will need: (4) - 45", (4) - 24", (4) - 21", (2) - 44 ¾", (2) - 18 ¾".
3. Cut all wood with a miter saw. All cuts are straight no angles. If you do not have a miter saw, you can use a hand saw or ask the place where you buy the wood to cut it to size for you. (There may be a small fee!)
4. Paint the cut ends. The fastest way is to just dip the ends into the paint can and wipe off any extra paint with a rag on the sides of the 2x2.
5. Make the top and bottom frames. I use two 2 ½" screws on each of the four ends. I pre-screw these ends. It makes putting them together much easier. You can also pre-drill if you want. To make the frames you will be using four 24" and four 21" pieces of wood. The 21" pieces go on the inside when making the frame, so each frame will measure 24"Lx24"W.
6. Use the four 45" pieces and attach them to the each of the four corners of the two frames. This will make the whole cage frame, less the door, to attach with your choice of screen.
7. Now use the last four pieces of wood to make the door, the two 44 ¾" and two 18 3/4". The 18 ¾" pieces go on the inside when making the door frame.
8. You may have your own way of applying screen. I use the following way - One piece of screen that goes around the top, bottom, and sides of the cage frame. The screen is stapled on the bottom of the cage frame and the front of the cage inside where the door sits when closed. Then add a small piece of screen on the back of the cage. I fold the screen to double it up before stapling, this holds the screen tight.
9. Add screen to the door. Staple the screen on one side of the frame. This will be hidden when the door is closed.
10. Attach the door with the hinge set. I mark 4" from the top of the cage and bottom of the cage and this is where I attach the hinges, then to the door its self. Add the handle and door lock and you are done.
This is just a basic cage much like a Reptarium™ so there is no hard bottom. You can modify the cages to have a hard bottom by attaching plywood or make the cage around a plastic basin. These cages will stack easily. You can make simple modifications for your needs. This allows you to do a number of different things with lighting, heating, and misting. The possibilities are unlimited so be creative!
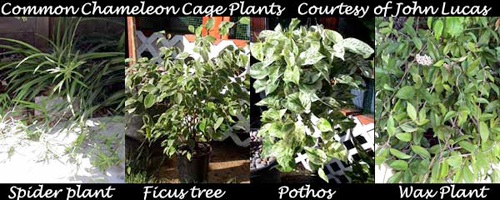
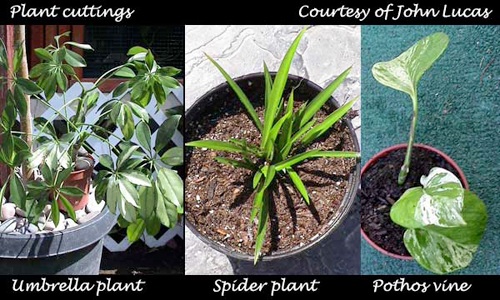
Plants, Plants and more Plants!
Live plants - the sooner you get them started the better off you will be! The 3 most common used live plants for chameleons are Ficus (Ficus benjamina), Umbrella (Schefflera arboricola), and Pothos (Epipremnum aureum). Some other lesser known or used plants would be the spider plant (Chlorophytum Comosum) and Wax plant (Hoya Exotica). All can be found at your local home improvement store with the exception of maybe the Wax plant. You might already have some of the above plants in your breeder's cages.
The point of planning ahead is to save time and money by having everything you need ready at home. It doesn't sound like much, but trust me it all adds up. For each cage of babies you will need at least two live plants and more for larger cages. If you already have large mother plants some cuttings, a little root hormone, and potting soil goes a long way. If you start growing the plants right away you can go this route, if not then small 4" pre-rooted plants are your best bet. The idea is to get started early. If you take root cuttings or buy very small plants when your chameleon lays eggs then by time the eggs hatch you will have plants large enough to be used in the baby cages. Price out plants large enough to be used right away and you can see the advantage of thinking ahead for that clutch of 30 panther chameleon eggs!
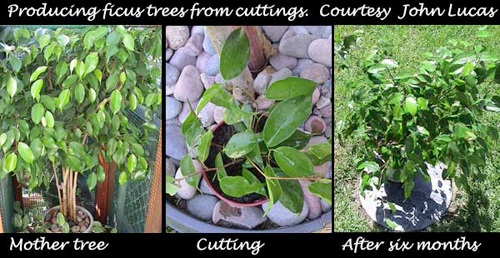
Option # 1 Root Hormone: Using a root hormone, which can be bought at your local home improvement store or nursery for around $10, could save you money. It will only save you money in the long run if you need more then 5 plants and have plenty of the mother plants listed above available to take cutting from. Another thing to take into consideration is it will take cutting longer to grow. (If you are not a plant person and have bad luck with plants in the past then I would recommend option # 2!)
The basic idea of the root hormone is to promote new root growth in small softwood cuttings. The cuttings you take from the mother plant should be around 6" long and only the newer softwood growth should be used. Don't try large cuttings as they usually won't take well and become a waste of time. When you take the cutting, make the cut just below the leaf node (the bump below the leaf stem). This is where the cutting will take root. Make sure you use sharp sheers/scissors to make a clean cut when taking the cuttings.
Dip the cutting in water. This is to get the root hormone to stick. Shake off any excess water and then dip the cutting in the root hormone. Place the cuttings in groups of 3-5 close together in pots with a good potting soil that allows for good drainage. Keep the cuttings in partial sun. In cold climates, use a plastic bag and cover the cuttings. I like to use plastic shopping bags and rubber bands to secure the plastic bags to the pots. Keep them indoors by a window where the cuttings will get sunlight through the window. Another idea is to use deep plastic pie/cake/cookie covers that stores sell their baked goods in. You can fill these with potting soil and groups of cuttings. After they root you can re-pot them. Keep the soil moist until the cuttings take root then water as needed. If you over-water them or use a soil that doesn't drain well the cuttings will rot and die. Before you know it, the plants will start to grow. And if you start them when your eggs are laid you will have plants large enough to use at the end of the standard 6 to 9 month incubation period. NOTE: The root hormone will come with instructions on how to use and handle it. Read all directions before you use it!
Some of the plants will not even need a root hormone, and can be easily propagated with simple cuttings. The vine plants like the Pothos, Spider, and Wax plants will take root by soaking small cuttings in water. When you see roots transplant them in to small pots with fresh soil. I have had good luck with just putting the cuttings right in to a small pot with soil, and keeping the soil moist all the time until the cuttings take root, then cut back on the water. The extra 4" pots that are leftover can be put to use with some small cuttings from these plants, potting soil, and water.
Option # 2 Baby Plants: If the root hormone sounds like too much for you or you simply don't have mother plants to take cuttings from then 4" pre-rooted plants are the way to go. You can buy most of all the plants listed above and others in 4" pots for $1-1.50 each at home improvement stores or nurseries. Going this route will put you months ahead, and is a safer route because you wont have to worry about doing something wrong and finding that the cutting didn't root.
The plants we use for our chameleons come in different pot sizes from 4"-5gal+. Since we have time on our side you can start off with the small 4" pots and by the time 6-9+ months goes buy they will be just as large as the 6-8" potted plants we most commonly buy at $5-12+ each. So doing some fast math you can save anywhere from $3.50-10.50+ per plant (not factoring in any pots or soil you may need to buy). You will be using more then one plant, of course. Depending on the clutch size, you could need anywhere from 5-20+ plants to make your babies happy. This saved money can be spent on lighting, heating, drippers/auto mister, and other items that you will need. (Editors note - perhaps spend it on a special present for your "significant other" before explaining that the chameleon population in your home is about to dramatically expand).
Step 1: Buy as many 4" plants as you think are needed for your clutch and get a few extra. Remember at least two plants/trees per cage. (I like to use as many as I can fit in the cage.) For the sake of this article, let's say I have 4 cages to set up for the babies. I would need at least 8 plants and 2 extra ones (just in case) for a total of 10 plants. I always tell my self "You never can have too many plants, if it looks good, buy it."
Step 2: You will need to get some larger pots for transplanting. I like to use 6-8" plastic pots, if you don't already have some lying around at home you can buy them for under $1 each. You will also need some good potting soil of your choice. Since the plants most likely will not be re-potted again, get a soil without perlite (little while balls). Then just simply transplant the 4" potted plants in to the 6-8" pots, add some extra potting soil, water and watch it grow! Ja-Ja-Jungle!
Note: The reason for avoiding Perlite is that these plants would be used in cages with babies and/or adult chameleons. I have noticed chameleons have a taste, so to speak, for perlite. If ingested in large amounts it could cause an impaction. This would be even more of a problem with smaller chameleons. Even when you cover the soil with large river rock to keep the chameleons out, they will try and shoot their tongues through the rocks to get to the prelite. So the only way around this issue is to use soil without perlite. Or, at the very least, use a soil that doesn't contain perlite as a top soil then cover it with rocks before you place the plants in a chameleon cage.
Ultimately the hatchlings' fates are in your hands. The better you prepare yourself the better off the babies and you yourself will be. There is a lot of work involved in keeping and breeding chameleons. It is not always a walk in the park!
Putting a plan together before you breed can do wonders for you, your wallet, and, most of all, the babies! These money saving tips are not cutting cost by cutting quality of care. They are just simply eliminating cost. Think of them as coupons. If I do this then I can save "blank" amount. I look at it like this - both parties are in a win-win situation. You save money and stress by being prepared, the babies win by having everything ready for them. They don't have to suffer because you don't have anything set up. You can't always rely on your local pet shop down the street to have everything you need right when you need it. I don't like to rely on anyone but myself. You can never be too prepared!

John Lucas

John W. Lucas has been working in the pet industry for 5 years. He has always been fascinated by chameleons and maintains a small breeding group focusing on F. pardalis locales. He is located in beautiful Southern California. His articles and website, Chameleon Paradise, reflects his focus on issues of cutting cost via DIY (Do It Yourself) projects. He enjoys sharing some of his ideas with others who share a passion for chameleons as he does. You can contact John via email at info@chameleonparadise.com.


Join Our Facebook Page for Updates on New Issues:
© 2002-2014 Chameleonnews.com All rights reserved.
Reproduction in whole or part expressly forbidden without permission from the publisher. For permission, please contact the editor at editor@chameleonnews.com
