


Breeding Crickets
By Don Wells
Citation:
Wells, D. (2003). Breeding Crickets. Chameleons! Online E-Zine, January 2003. (http://www.chameleonnews.com/03JanWellsCrickets.html)
Breeding Crickets The Easy Way
Over the years Herpetoculturists as well as many other people have used insects to feed a host of creatures that consume insects in their diets. Hobbyists keeping wildlife such as birds, fish and even other insects have relied upon the common mealworm to meet their needs for many years. In recent times ( past twenty years) the Common House Cricket has slowly emerged as a much better feeder insect since it is more digestible, easier to gutload and dust with nutrients and is more readily acceptable than the harder skinned mealworm.
Crickets are mainly bred on a commercial scale by insect breeding firms. Private hobbyists often set out to breed their own insects but all too often fail after a short time. The reasons for this are many but usually the sheer tedium of insect rearing along with poor results discourage the household breeder from persisting further. Rearing insects of any kind is great fun and personally I think more fascinating than many higher forms of animals! The following method of rearing Crickets on a small scale is easy and if followed carefully anyone can succeed with breeding enough to satisfy their needs.
What do I put them in?
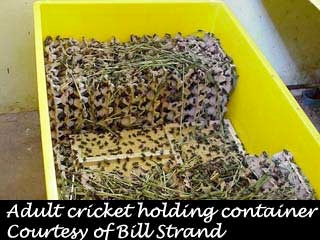
Crickets, like many insects, are escape artists. They need to be maintained in a safe and easy to work with container where they can not escape and distribute themselves all over the house. I have used and experimented with many such enclosures over the years and truthfully my favorite is the simple cardboard box! I realize this sounds totally crazy so I will explain in more depth. I have used plastic bins of varying sizes and depths and they work also but often escapees happen because the boxes are just not deep enough and the crickets are often close to the top and can leap out when the top is off and the keeper is cleaning or catching crickets to feed. If you don't mind catching the escapees or hearing your family complain when a wayward cricket crawls in bed with them use the plastic bin or other container that suits you. I do raise the smaller sizes of crickets in plastic blanket type storage boxes, however, but once about half sized I change all to the cardboard box for further rearing.
Several years ago a very good friend that has raised more crickets and other insects than anyone else I know told me about using cardboard boxes with tops that close, to raise my crickets in. At first I was skeptical because I thought this was the fastest way to have a houseful of bugs crawling everywhere once they ate a hole in the side. My fears have never materialized and in subsequent years I now only use cardboard boxes with flaps that can be closed when not open. The thicker the cardboard the safer you are from escapees so utilize the thickest you can get and always have closeable flaps on the top. The pictures included in this article show an all plastic system. It can be done either way. I'll tell you my preferences, though, and let you make your own decision!
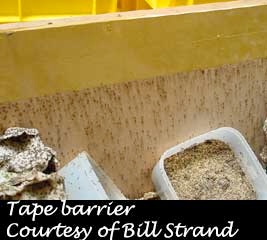
Of course, a barrier of some sort has to be applied to the upper edge of the box so crickets cannot crawl out. This can be achieved in several ways. I use slick packing tape which is placed on the upper inside edge about six inches down from the top and about three inches thick. Crickets cannot crawl over this material. I like the brown tape which is available anywhere postal supplies are sold. The surface is very shiny and slick. Another option which I have tried and seems to work but requires more maintenance is the use of blackboard chalk that will make a three inch swatch of chalk around the inner edge. Crickets don't seem to be able to get a good foothold on this surface either. This has to be renewed from time to time, however!
I utilize a box that's at least 30 inches high. Anything less and you risk escapes. The top flaps are closed either by intertwining them in the typical fashion or by placing a weighted object on top once folded in place.
Cardboard provides many advantages to the insect breeder. It's cheap and available everywhere. It can be thrown away after one or two uses and replaced again which cuts time and keeps things clean and sanitary, a very important thing with raising bugs! I generally will run a batch of crickets through a box twice then dispose of it and get a new, clean one. Cardboard also offers a good crawling surface and provides all important surface area for crickets to space themselves out on. I have never had a cricket ever chew out of a cardboard box. I think they somehow feel very comfortable inside this material if kept warm enough and given hiding places and food and water.
Selecting Breeders
The Cricket breeder should start out by selecting crickets that are about three quarters grown for their future breeders. These should be approximately four or five weeks old and about ½ inch long (13mm). By starting out with pre breeder sized insects you give the future breeders time to adjust to your particular breeding set up ahead of the time they will be producing for you. You also will get the chance to condition the breeders on a better diet than what they might have been fed if you were merely buying adults ready to breed from a store or other supplier. When selecting future breeders I suggest you buy a thousand crickets and then sort through them and pick out ¾ of the breeder stock as females. This will assure proportionally more eggs with less disturbance from excess males. What we are striving for here is to have a proportionally larger female population which will most likely lay far more eggs than the average hobbyist can use at one time. Feed off the excess males as you do not need many to fertilize the females. In future batches always maintain this practice and you will discover that your production will always be better than if you just catch out a population of random insects for breeding purposes.
Sexing
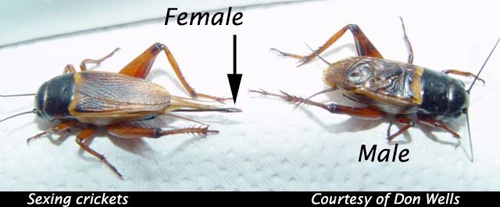
If you don't know already you soon will. Sexing crickets is simplicity itself. Basically a female cricket needs a way to stick hundreds of eggs under the soil. This is accomplished through a long hardened tube attached to the end of her abdomen. This often looks like a stinger of sorts but of course isn't. The male will have a "V" type tail while the female will have the "V" with a long tube down the middle. Females are selected at about half grown size when the ovipositor can be seen developing. Selecting your females out along with about a ¼ ratio of males will provide you with a good sex ratio that should produce a lot of nice offspring.
Staggering numbers
It might be necessary to stagger your hatchings since most females that you will start with will likely produce eggs almost at the same time and will die shortly afterwards. This means you will have gaps in production unless you sort out smaller insects from the faster growing ones and stagger the production of eggs. One method that works well is to slow down hatching rates on eggs by keeping some batches cooler which caused later hatching times. The same method can be done with growing crickets which will stagger future breeding adults for ones needs. Every breeder has to work out the best methods that suit their particular needs. Some breeders will soon find that they need to keep only a couple hundred cricket breeders and that this number will keep them up to their eyeballs in crickets.
Life is short
The entire cricket raising process from egg to death when kept correctly is about six weeks. This time span can be increased by providing lower temperatures and feeding lower protein based food. Slower raised crickets will reach bigger sizes and seem stronger. Of course its your choice since your playing cricket God and their lives are in your hands. I prefer slower raised stronger crickets raised on a lot of green food such as vegetables and weeds and some protein. It seems just more natural to me but I have no proof that this method produces a nutritionally superior insect?
Okay now you're ready........... Well not quite!
Once you have assembled your starting box, some nice fat juicy crickets and are ready to jump into the cricket breeding business you need just a few more items and your set!
1.A place to put the infernal noisy things! A spare bedroom, closet or other place away from sensitive ears especially at night. I like to hear crickets so this part I never pay any attention to!
2. A place where the occasional escapee can be easily recaptured.
3. A place that maintains somewhat even temperatures so they don't freeze or get overheated. Again I like a closet that's empty for this purpose. A small coat closet can easily house all the needed space for rearing adults and young alike and can be closed off from the rest of the house. Of course your wife/husband might not like to see their clothes unceremoniously thrown on the bed or worse under it, so hold a little ceremony first! If you have kids they usually don't use their closets anyway, so steal one of theirs! All kidding aside, just find a good place that's easy to work in and out of the way. I know breeders that have taken thick pieces of Styrofoam insulation and pegged these together with long nails and a top panel. This stuff is really nice to work with and can be put in the garage and kept toasty warm in a blizzard if need be by the use of just a small light bulb inside!
4. You need to keep your crickets warm and in a temperature range from 78- 86 degrees Fahrenheit. Crickets will grow faster on the high side and slower when kept on the lower or even slightly lower temps of the upper seventies.
Yikes! what's that smell??????
Crickets can stink if not kept clean! Keep them dry and warm and they will do the best for you. This doesn't mean they shouldn't have water. They need water and without it on a constant basis they will either shrivel up ( when very young from pinhead i.e. just hatched stage to about 1/8 inch long) or will eat each other in great numbers if not given plenty of moisture. You just don't want them living in damp quarters with spilled water etc. The best way to water them is to spray down the surfaces they live on ( more about this later) twice daily or give them lots of succulent vegetables in the form of fresh produce and remove it when its wilted or dried up. Another way is to offer water in shallow bottle tops or even chick watering basins but in reality I have always found this way messy and prone to spills. Personally I like the fresh greens and vegetables best along with the spray downs.
Where did all the neighbors come from?
Crickets live somewhat separate lives in nature. They do not live in huge crowded colonies as kept in captive breeding situations. Some species of crickets actually eat each other readily when they happen on each other but the common Brown House Cricket lends itself to captive culture well but cannibalism isn't foreign to them and its not unusual to lose from 1/3 to ½ of your original production over the span of six weeks of growing so many bugs all together.
The best way to keep as many crickets as possible without them munching each other is to give them as much surface area and hiding places as possible. The flat egg carton as used for packing commercial eggs for restaurants serves this purpose well. Other alternatives are rolled cardboard , wadded up newsprint etc . Just keep your bugs as separated as possible and with plenty of places to hide in so they feel more secure and less stressed. If you do use the egg crating pile it on top of each with small open spaces in between. Some breeders stack the crating vertically on its side.
All those hungry mouths!!!
Crickets will eat just about anything you eat and then some. I have tried many diets over the years and have settled on basically a 50% green diet which includes such things as wild and safe weeds, Tree leaves from Mulberry, Alder, Grape Vines and vegetables such as Chinese Kale, Broccoli, Carrot, Okra, sprouted grains etc. Fifty percent is a prepared diet such as ground chicken food made for chicks but not medicated or good grade of dogfood. Walkabout Farm manufactures a diet I have heard rave reviews about and its well worth looking for, from all reports!
Breeding
When crickets reach the ripe old age of about five weeks old they will start to look for places to lay eggs. They have most likely been breeding already especially if grown quickly and at higher temps. The females will be plump with eggs and their abdomens will be seen to be swelling almost daily. The males will start breeding the females shortly after starting to sing. Normally this happens after the last shed when they develop full wings.
Females need the following in order to lay
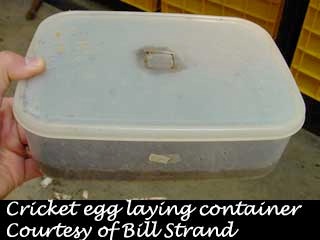
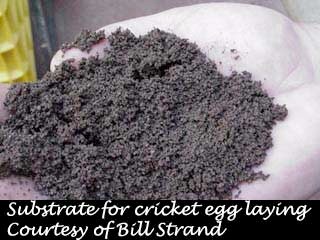
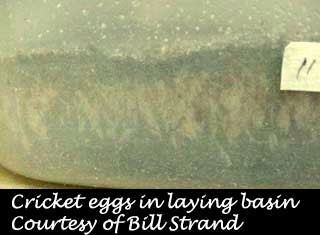
1. A laying receptacle full of a damp but well drained medium such as soaked and squeezed peatmoss mixed with fifty percent fine building sand or silica sand, Clean garden humus, Fine ground vermiculite. These containers need to be changed out every other day once laying commences. Males especially will raid these and dig up eggs to eat. Taking the males out is a chore but some folks do this. I have placed fine meshed wire over the laying beds and the females will insert the ovipositor through this if it suits them. Choosing the right mesh seems to be main problem here. Too fine and they cant use it well. Some batches of crickets seem more passive than others when it comes to egg eating.
2. Egglaying receptacles should be approximately 1½ inches to two inches tall at most otherwise females have a hard time entering them unless they are bridged somehow from one to another. I like small sandwich keepers for this purpose and they can be gotten virtually anywhere plastic housewares are sold.
What about the kids?
Once eggs are laid and removed a top needs to be placed over the medium. I like to cut a small 1 inch hole in the center of the top and place some fine metal wire over this. This wire is so tightly woven that it will not allow fungus gnats entrance to the laying medium in the container. This special wire allows air passage enough so that the incubating egg medium doesn't perspire and high humidity condenses on underneath side of the top and when the crickets hatch they will not drown in this condensation. I have had entire batches of literally thousands of crickets lost to this problem.
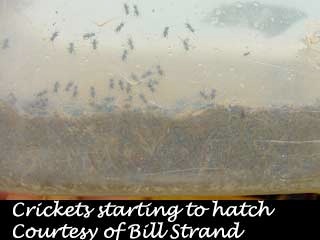
Incubation of eggs can be done in anything that keeps them at a constant temperature between 75-85 degrees Fahrenheit. At the higher levels they hatch in about 7 days and at the lower temps they can take as much as two weeks to hatch. It seems everyone has a different experience with this.
Some folks use a lightbulb in a closed styrofoam fish shipper to incubate with. Others use bottom heat in the form of reptile type heat pads pr strips. Either method works and this is also the way most warm the breeders quarters also. I find the reptile heater pads the best if in a small area. One fellow showed me an old insulated refrigerator he used to hatch and keep his crickets in, heated by a simple thermostat and reptile heating strip. It worked like a charm. The sky is the limit and I am sure many of you will come up with ingenious ideas on how to heat your bugs and keep them happy. Just one word of caution, always allow any heating strip enough air passage so its not entirely closed off. Fires have been caused by improper venting so always watch for this and take precautions.
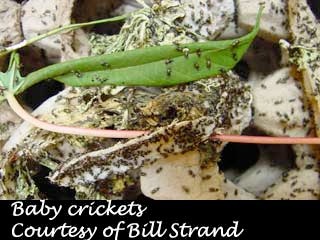
Feeding baby crickets is virtually the same as the adults. Feed them on the same things recommended for the adults above.
Baby crickets will require higher humidity than the older ones do and if not given this they will dry up in no time. Finding the right humidity can be a chore so look for around 85% to start with. Water them with lots of greens and replace often. You can use open water containers plugged with cotton etc but in my experience this only gets smelly and dirty pretty quickly. I much prefer the greens as a way to keep them happy as far as water for drinking goes. A good basic green is regular Romaine lettuce. They will devour this quickly and you will need to keep them supplied with fresh. It amazing how fast so many little tiny bugs can go through a big leaf of Romaine!.
Hatchlings can be reared for the first ten days in plastic blanket boxes or shoe boxes. The larger the enclosure the more apt they are to dry up so watch this carefully. Give them lots of hiding surfaces and the egg crating comes in handy here again for this purpose.
Good luck with your bug rearing! Hopefully I have explained this so everyone understands the basics. If you have any further questions just email me and I will try to fill in any gaps.


Don Wells

Don Wells has worked with animals much of his life. His present interests include disseminating proper husbandry techniques for animals kept in captivity. He has kept multitudes of insects and continues to experiment with new species.


Join Our Facebook Page for Updates on New Issues:
© 2002-2014 Chameleonnews.com All rights reserved.
Reproduction in whole or part expressly forbidden without permission from the publisher. For permission, please contact the editor at editor@chameleonnews.com
